– Introduction of the Course AI Development for SAP® Developers – Hands-on: Using Nvidia GPU to run GPT-OSS-20B Using LLaMAC++ – Part 1 – Inspecting Usage of SAP® CAPM MCP Server and Tools Provided – Using MCP with Cline to Generate the CAPM Project – Using Codex for CAPM App Generation – Debugging the CAPM App with Codex and Adding MCP Capabilities – Greenfield CAPM Implementation with GPT OSS 20B in Cline Using MCP – Final Project Status after Running the CAPM Development with MCP and GPT OSS 20B
Want to learn more? If you want to dive deeper into how you can develop apps using SAPUI5 and SAP® CAPM with MCP, we highly recommend the UI5CN Learn AI Development for SAP® Developers course. It covers these topics alongside others, such as: working with AI and LLMs, using agents (like Claude, Codex, and Cline) to run LLMs, practical hands-on LLM usage, SAP® MCP, AI SDKs, and more!
– Introduction of the Course AI Development for SAP® Developers – Types of AI Agents/LLM Based on Size and Types – Hardware Requirements to run AI Agents/LLM – Using-Ollama.com for Agents/LLM Search and Quantization of Models – Using Huggingface site, Safetensor vs GGUF Models Type – The Models which we will use, GPT-OSS-20B and Devestral-2-Small-24B
Want to learn more? If you want to dive deeper into how you can develop apps using SAPUI5 and SAP® CAPM with MCP, we highly recommend the UI5CN Learn AI Development for SAP® Developers course. It covers these topics alongside others, such as: working with AI and LLMs, using agents (like Claude, Codex, and Cline) to run LLMs, practical hands-on LLM usage, SAP® MCP, AI SDKs, and more!
When you interact with a Machine Learning Model—often referred to as an LLM, or Large Language Model—it needs to have knowledge of the specific type of work you want it to perform in order to be truly useful.
For instance, if you want to carry out CAPM (Cloud Application Programming Model) or SAPUI5 development, the LLM needs to internally understand the different concepts behind these frameworks. It must know their specific syntax and functioning to generate accurate code.
Most of the time, you are interacting with LLMs trained on massive amounts of data available on the internet. During its original training, an LLM consumes data spread across blogs, open repositories, help documents, and more. It then generates output based on this general learning.
Often, generic, general-purpose LLMs have consumed information on terms and topics across multiple domains. When we demand expertise from these LLMs for a highly specific task, you might not get the best outcome unless:
The LLM has been explicitly trained or fine-tuned on domain-specific large datasets.
You are using an extremely large model (e.g., 200+ billion parameters) that already possesses comprehensive, in-depth knowledge and domain expertise in your field.
Another way to achieve this is by providing the LLM with the context of your domain. If the LLM understands basic logical operations, it can derive linkages from your specific domain context.
For example, imagine you provide an SAP® CAPM help document to an LLM that has limited prior knowledge of CAPM coding. Internally, it might be well-versed in JavaScript and other open-source stacks, but because CAPM isn’t entirely open-source, the model might lack extensive training in CAP programming specifically.
How Chunking and Context Work
Rather than passing an entire help document to the AI, you divide the development practices into different sections based on the specific activities that need to be carried out. In LLM terminology, these individual sections are referred to as chunks.
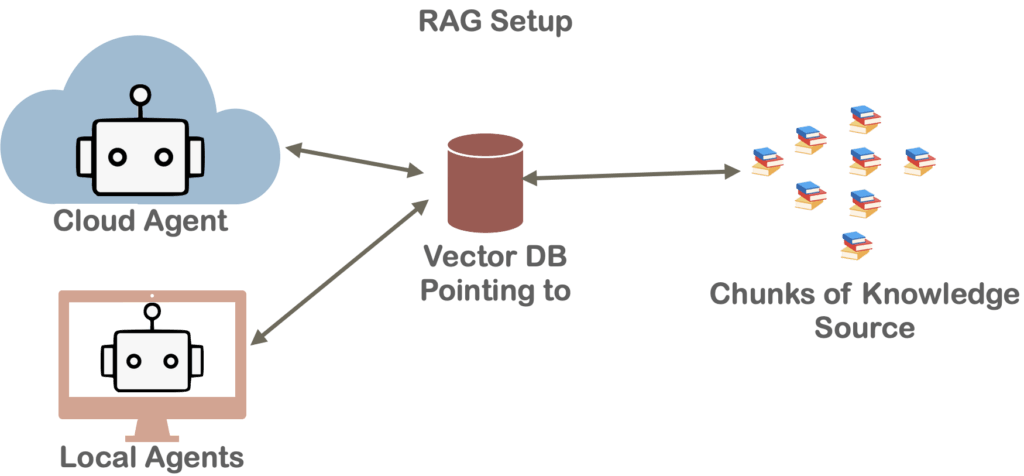
Once you have divided the entire help document into chunks based on relevance, you pass only the chunks the LLM currently needs to know. The reason for this is the context window (or working memory) limitation; passing an entire document requires significantly more processing power and VRAM. Therefore, based on the specific task, you pick the relevant chunks and pass only those. This is typically managed using a Vector Database (Vector DB), which stores and retrieves these chunks based on the user’s task to provide context to the LLM.
It can also happen that, instead of a static help document, you are talking to a live system and extracting information in real-time. The system can provide data records on the fly based on what is requested.
Enter the Model Context Protocol (MCP)
This entire process of dynamically providing data is being standardized through the Model Context Protocol (MCP). Through MCP, you pass data into the LLM’s context. In simple terms, you extract relevant information and dynamically feed it into the LLM’s working memory.
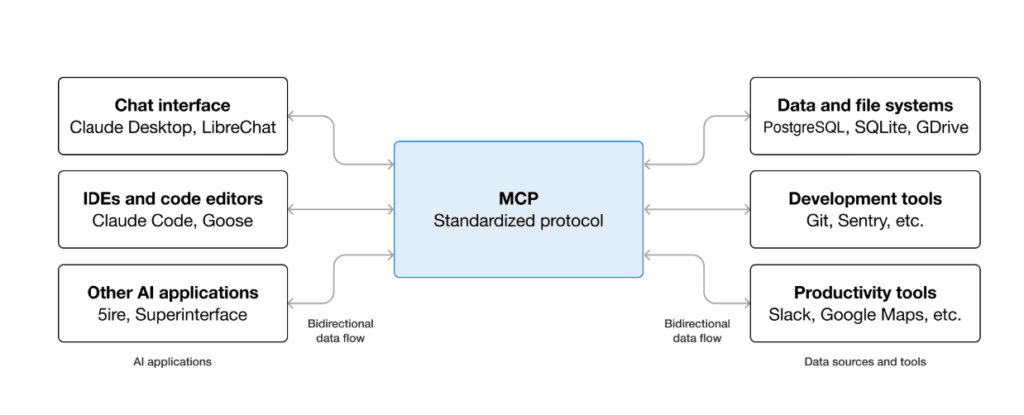
The Model Context Protocol (MCP) is an open standard and open-source framework introduced by Anthropic to standardize the way LLMs integrate and share data with external tools, systems, and data sources. MCP provides a standardized interface for reading files, executing functions, and handling contextual prompts. The entire MCP protocol operates as an open standard (now hosted under the Linux Foundation).
MCP gives everyone a single, agreed-upon standard—much like the USB-C standard for hardware—allowing you to connect external data to AI systems using an open and common framework. Under the hood, MCP uses a client-server architecture powered by a lightweight messaging format called JSON-RPC 2.0.
An MCP Server is a program that exposes a capability—like “read this database” or “create a sales order.”
An MCP Client (usually your AI assistant or the app it lives in) connects to that server and uses those capabilities.
The Protocol itself is simply the shared language they use to communicate.
MCP in Development
When we build SAPUI5 apps from scratch or extend existing functionality, dedicated MCP tools are provided to help standardize the LLM’s responses.
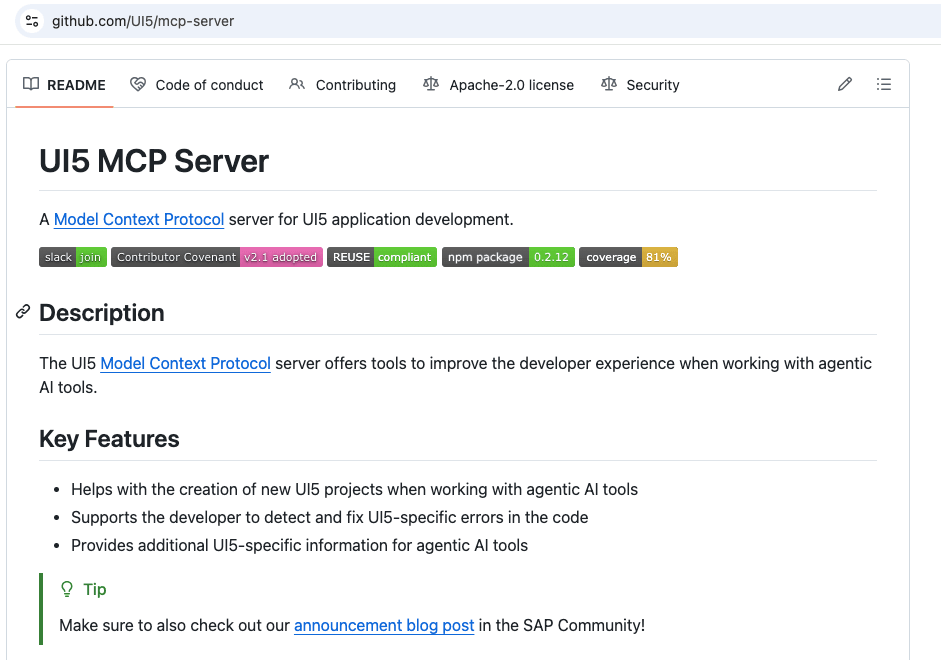
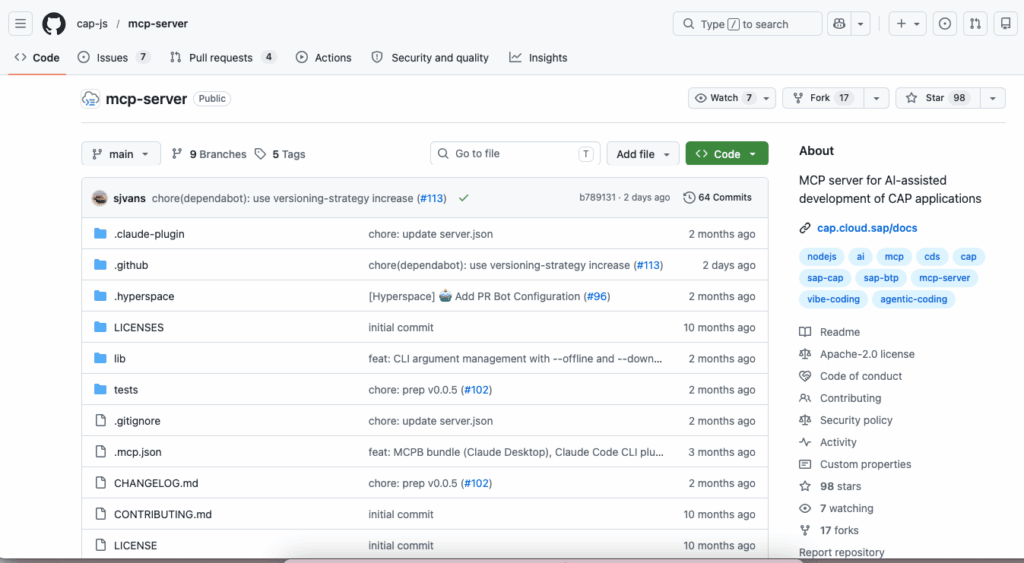
The UI5/mcp-server and cap-js/mcp-server are specialized MCP servers designed to enhance AI-assisted development within the SAP® ecosystem:
The UI5 Server: Equips AI agents with tools to scaffold UI5 applications, validate manifests, and pull specific UI5 API documentation and best practices.
The CAP Server: Empowers AI models to natively understand the SAP® Cloud Application Programming Model by allowing them to fuzzy-search CDS model definitions and perform local, vector-based semantic searches through CAP documentation.
As an SAPUI5 and SAP® CAPM developer, if you are building apps by directly interacting with AI agents like Claude, Codex, or others, you will find that the agents initially generate code based solely on their pre-existing training for that framework. Adding MCP support to your coding agent will further boost accuracy, steering the AI toward not only more standardized code but also more accurate, best-practice-based outcomes.
Want to learn more? If you want to dive deeper into how you can develop apps using SAPUI5 and SAP® CAPM with MCP, we highly recommend the UI5CN Learn AI Development for SAP® Developers course. It covers these topics alongside others, such as: working with AI and LLMs, using agents (like Claude, Codex, and Cline) to run LLMs, practical hands-on LLM usage, SAP® MCP, AI SDKs, and more!
You are sipping a warm cup of coffee on a Wednesday morning and pondering how your work will be impacted by AI. You have been reading too many tech journals and media coverage of cutting-edge devices that seem like a sci-fi movie. Let me tell you, the real, implementable solutions for actual productive work have not yet been realized.
All you are acquainted with right now is interacting with LLM chatbots that have a massive volume of understanding. It may look like a “Search engine on Steroids”— but it is actually more like “Matrix Multiplication on Steroids”.
Parameters
When it comes to Generative AI use cases, you will find the ability to generate something new that was never present before. The question worth asking is, “Is the generated output useful for you?” The answer vaguely depends on how many billion parameters your model is running and how well it is trained on your specific use cases.
Now, let me show you a simple example: if you tell an LLM with around 20 B (billion) parameters to create a full ERP implementation of your existing SAP® systems, then you have probably gotten the AI equation wrong. Both in relationships and LLM prompt engineering, keeping expectations realistic is key.
RAG(Retrieval-Augmented Generation)
Let’s try one more scenario. You have a large inventory dataset, and you want to find certain information. You don’t want to look into serial numbers that look like SSH key mumbo-jumbo, matching each character one by one, figuring out the product information, and checking its availability and supplier details. Aha! This is the right use case for our LLM friend, but with a twist.
Because LLMs aren’t databases, asking them to memorize millions of serial numbers will just make them hallucinate fake ones. Instead, we use a clever trick called RAG (Retrieval-Augmented Generation). You let the LLM act as the “brain.” It writes a query, searches your database for the exact product ID, links the supplier info, and then explains it to you in plain English. Comparing the inventory catalog and linking information—these are the types of use cases it is well-equipped to handle when paired with your tools. It’s more like a Math Olympiad winner who is strong in logic; the more parameters it has, the better it can reason.
Neural Network
Now comes the part about how you will use it. Does it require special hardware to run, or can our same old PC or Mac run this new-age Machine? The answer relies on how well you want The Machine (the LLM) to run. It’s packed within itself neural network layers. Neural network layers contains the information it learns in Maths formulas, each time it learns something new, it changes the internal formula. These adaptation is called training. The Neural network to be specific are stored in numbers. These numbers are called weights. Over time The Machine(LLMs) adjust the number and makes itself better. Think of it as many layer of autocorrect. Each layer corresponds to a specific activities and performs those over your inputs. Think of it a big factory where the raw material which is your prompts and input enters and in each steps along the way it is transformed into something different. The final result of the factory is your output.
GPU(Graphical Processing Unit)
When so much activity is carried out, it overwhelms your regular CPU and memory. If you need it done at a reasonable speed so it feels more like standard computer usage rather than a slow science experiment, you will need special hardware that can carry out these massive operations very fast. We call this special hardware a GPU. Yes, the exact same GPU you use to play your favorite Need for Speed.
This special hardware can carry out certain matrix multiplications in parallel, which is how the different layers of an LLM talk to each other. This hardware is costly, and you need to procure it before you can run your LLMs locally.
Now, the question that arises is: How do you know which LLMs to use and what kind of GPU you need?
Glad you are paying attention and asking these smart questions, which is keeping the soul of our conversation alive!
Now, where were we regarding The Machine?
Yes, LLMs can serve different purposes. If you want image generation, it needs to be trained on a massive dataset of images. If you want it to generate nursery rhymes, obviously, it needs to be trained on nursery rhymes. You get the point—it needs to be trained; otherwise, how on earth could it figure out what is expected of it?
Popular LLMs
For software development LLMs, some of the absolute best models can be found on Ollama and Hugging Face. These are wonderful hubs where you can get some highly capable LLMs for free, or to be specific, under open-source licenses.
Some fantastic open-weight models include Meta’s Llama 3, Google’s Gemma or OpenAI’s GPT-OSS. You download these LLMs, and based on your GPU’s VRAM and capabilities, you pick a size.
LLMs Common Concepts
What is VRAM?
The VRAM here are your Graphics Card Memories which can run tuihese LLMs. Just like your Computer RAMs, VRAMs are specially designed to load your LLMs into memories and operate quickly in parallel. So, to run and train an LLMs GPU VRAMs are required.
LLM needs 70GB of VRAM, and you only have 20GB?
No problem. You pick a quantized version of the same LLM (like a Q4 quantization), so you get decent quality with massive memory savings. Quantization is your best bet if you want to run these Large Language Model with decent hardware setup. Think of it as a High Definition(HD) video in Raw Format which is large in size and you convert into a smaller size video to reduce size, without degrading the Quality of it. The same you can see in case of LLMs. You reduce the size without compromising on Quality.
What if you don’t have a graphics card?
Oh, no problem! Let’s use a cloud LLM. Honestly, running a local GPU takes a lot of energy and effort anyway. Here are some of the best cloud options: ChatGPT, Google Gemini, or Anthropic’s Claude. These are massive models with 200+ billion parameters. You don’t need to worry about the hardware setup, as these come with subscription or API-based usage.
The only concern here for businesses is privacy. If you use the free consumer web bots, they might use your interactions to get better. However, if you use their Enterprise APIs, your data is strictly locked down. They won’t train on your company secrets, copy your work, or publish it—meaning you still get to keep the appreciation award you deserve!
Wrapping Up
So, what have we learned in this section?
Why we need AI (The Machine).
What is behind this AI (LLMs, or Large Language Models).
How they are built internally (Parameters & Weights).
Why they need a special hardware setup (Graphics Cards / GPUs).
If you want to learn more on the subject, there is a highly recommended course called “Learn AI Development for SAP® Developers,” which demonstrates all of this in a hands-on way.
SAP® Build Code = SAP® BAS + Joule AI Chat to build App Boiler Plate + Storyboard + Page Map + Graphical No-Code Low-Code Development Features
In the rapidly evolving landscape of enterprise application development, SAP® has introduced a game-changing combination: SAP® Business Application Studio (BAS) powered by Joule AI. This powerful integration is fundamentally transforming how developers and business users create, customize, and deploy applications on the SAP® Business Technology Platform (BTP).
The Evolution of SAP® Development
Traditional vs. AI-Powered Development
The shift from traditional development methods to AI-assisted creation represents a paradigm shift in how we approach application building:
The Old Way:
Required significant technical knowledge to create, extend, and debug applications
Relied on wizard-based navigation for boilerplate generation
Demanded deep understanding of SAP® architectures and coding patterns
Time-consuming setup and configuration processes
The New Way with Joule:
Minimal to no technical knowledge required for app creation and extension
Chat-like interface for AI-powered generation
Intelligent boilerplate creation with full-stack capabilities
Streamlined, intuitive development experience
Understanding the SAP® Build Suite Ecosystem
SAP® BAS with Joule operates within the broader SAP® Build Suite, creating a comprehensive development ecosystem on SAP® BTP:
SAP® Build Suite Components Includes
SAP® Build Apps – Low-code UI development platform
SAP® Build Process Automation – Workflow creation and RPA capabilities
SAP® Build Work Zone – Unified launchpad experience
SAP® Business Application Studio (BAS) – The core development environment enhanced with AI which is called now SAP® Build Code
How It All Works Together
The architecture creates a seamless flow:
AI Generation: Joule generates full-stack boilerplate applications within BAS
Backend Services: Create and manage backend services efficiently
Service Consumption: Connect UI applications to backend services
Deployment: Deploy applications directly to SAP® BTP
Integration: Applications can be consumed through Work Zone
Automation: Workflows enhanced with AI add-ons through Process Automation
Getting Started: Three Practical Steps
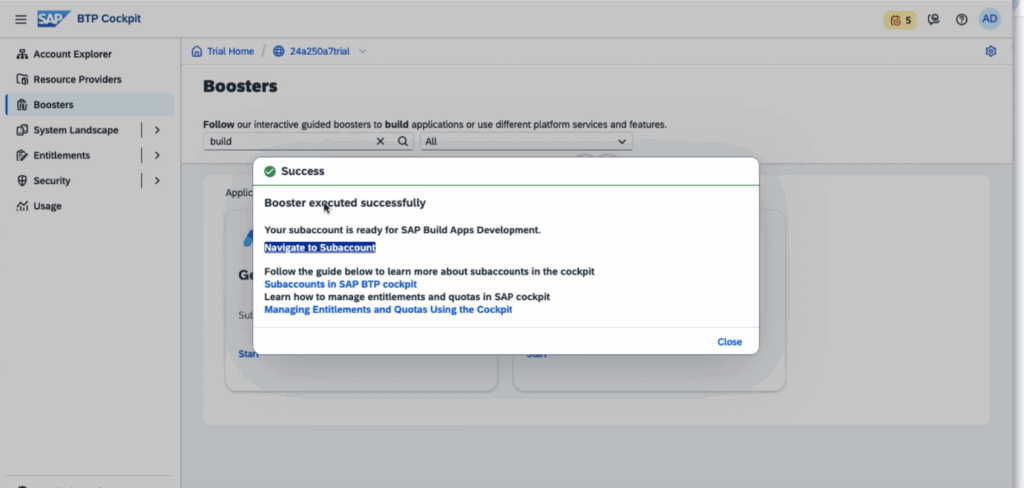
Step 1: Setup with Booster
The journey begins with proper environment setup using SAP® BTP Booster. This automated configuration tool prepares your SAP® BTP environment with all necessary Services, Roles, Auth and Entitlements setup, eliminating the complexity traditionally associated with platform setup.
Step 2: Create Your New Project
This is where Joule’s AI capabilities truly shine. Instead of navigating through complex wizards or writing boilerplate code from scratch, you can:
Describe your application requirements in natural language
Let Joule generate the full application structure
Receive intelligent suggestions for data models, UI patterns, and service integrations
Start with production-ready code that follows SAP® best practices
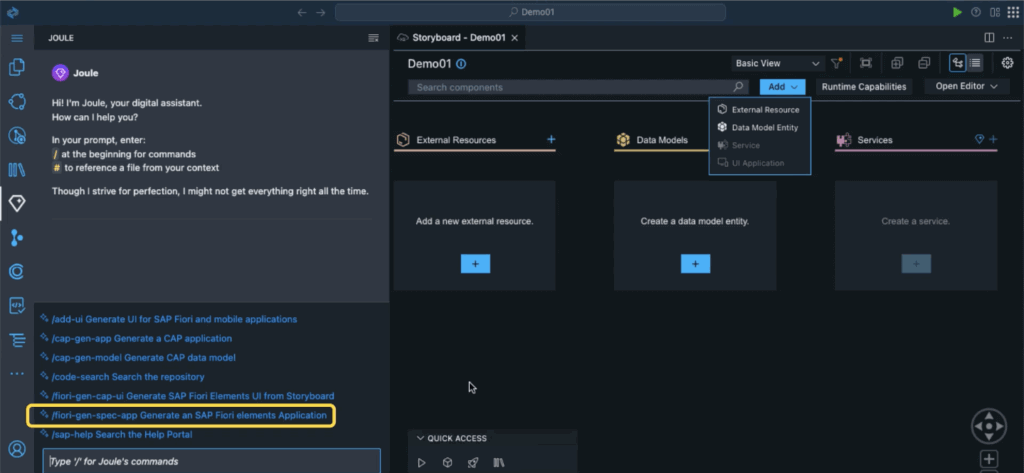
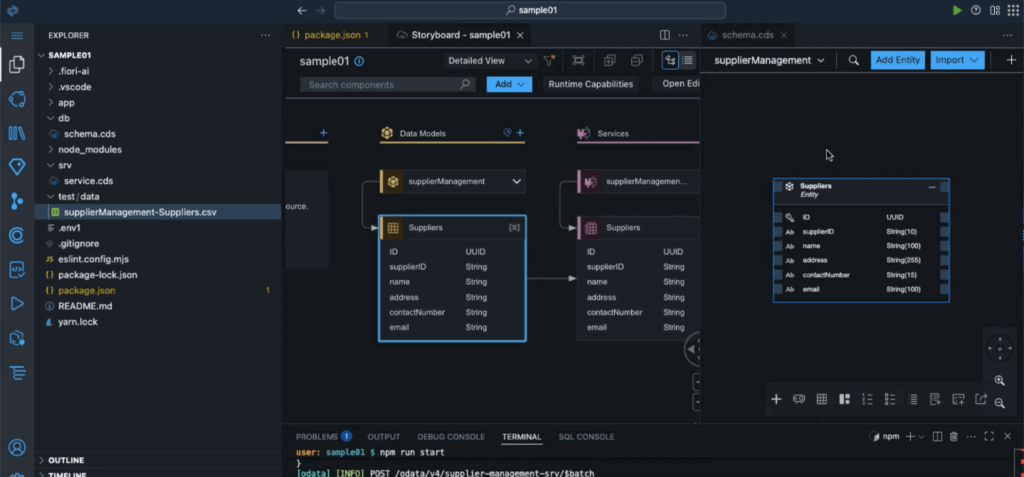
Step 3: Customization with Storyboard, Page Map and Graphical Modeller
The Storyboard, Page Map and Graphical Modeller feature allows you to:
Visualize your application architecture
Make customizations through the UI and no-code or low-code exposure
Extend functionality without deep technical knowledge
Storyboard (as shown in above image) will be first screen which will appear after your app is created via Joule AI, it will provide you an overview of the application. You can navigate further to Page Map which shows how different UI screens are linked. There are various graphical tools, such as the graphical schema tool and UI Annotation tool etc. to change Schema and UI respectively without Coding.
Why This Matters: The Business Impact
Low Code Development:
By reducing the technical barrier to entry, SAP® BAS with Joule enables:
Citizen developers to create meaningful applications
Business analysts to prototype solutions quickly
Professional developers to focus on complex business logic rather than boilerplate code
Organizations to accelerate their digital transformation initiatives
Accelerating Time-to-Value
The AI-powered approach dramatically reduces:
Initial setup time from days to hours
Development cycles from weeks to days
Learning curves for new team members
Maintenance overhead through standardized, well-structured code
Enhancing Quality and Consistency
Joule’s AI generation ensures:
Adherence to SAP® best practices
Consistent code patterns across projects
Built-in security and performance optimizations
Reduced technical debt from the outset
The Path Forward
The integration of AI through Joule into SAP® BAS represents more than just a feature upgrade—it’s a fundamental reimagining of how enterprise applications are created. By combining the power of conversational AI with the robustness of SAP®’s development platform, organizations can:
Bridge the skills gap in SAP® development
Innovate faster with rapid prototyping and iteration
Scale development capacity without proportionally scaling team size
Maintain quality while increasing development velocity
Summary: A New Era of SAP® Development
The journey with SAP® BAS and Joule follows a clear path:
Setup: Quick environment preparation with automated boosters
Getting Started: Hands-on development with AI assistance
Wrap Up: Production-ready applications with minimal or no development
As organizations continue to demand faster digital transformation and more agile development processes, tools like SAP® BAS with Joule aren’t just nice to have—they’re becoming essential. The combination of low-code/no-code capabilities, AI-powered generation, and professional development tools creates a platform that can serve everyone from business users to expert developers.
The future of SAP® development is here, and it’s more accessible, faster, and more intelligent than ever before.