Posted on

Google announced a private beta of their Google IoT Core platform

In a recent blog post, Google announced a private beta of their Google IoT Core platform. Cloud IoT Core makes it easy to securely connect your globally distributed devices to GCP, centrally manage them and build rich applications by integrating with their data analytics services. Furthermore, all data ingestion, scalability, availability and performance needs are automatically managed for you in GCP style.
When used as part of a broader Google Cloud IoT solution, Cloud IoT Core gives you access to new operational insights that can help your business react to and optimize for change in real time. This advantage has value across multiple industries; for example:


  • Utilities can monitor, analyze and predict consumer energy usage in real time
  • Transportation and logistics firms can proactively stage the right vehicles/vessels/aircraft in the right places at the right times
  • Oil, gas and manufacturing companies can enable intelligent scheduling of equipment maintenance to maximize production and minimize downtime

So, why is this the right time for Cloud IoT Core?

About all the things

Many enterprises that rely on industrial devices such as sensors, conveyor belts, farming equipment, medical equipment and pumps — particularly, globally distributed ones — are struggling to monitor and manage those devices for several reasons:

  • Operational cost and complexity: The overhead of managing the deployment, maintenance and upgrades for exponentially increasing devices is stifling. And even with a custom solution in place, the resource investments required for necessary IT infrastructure are significant.
  • Patchwork security: Ensuring world-class, end-to-end security for globally distributed devices is out of reach — or at least not a core competency — for most organizations.
  • Data fragmentation: Despite the fact that machine-generated data is now an important data source for making good business decisions, the massive amount of data generated by these devices is often stored in silos with a short expiration date, and hence never reaches downstream analytic systems (nor decision makers).

Cloud IoT Core is designed to help resolve these problems by removing risk, complexity and data silos from the device monitoring and management process. Instead, it offers you the ability to more securely connect and manage all your devices as a single global system. Through a single pane of glass you can ingest data generated by all those devices into a responsive data pipeline — and, when combined with other Cloud IoT services, analyze and react to that data in real time.

GCP

Key features and benefits

Several key Cloud IoT Core features help you meet these goals, including:

  • Fast and easy setup and management: Cloud IoT Core lets you connect up to millions of globally dispersed devices into a single system with smooth and even data ingestion ensured under any condition. Devices are registered to your service quickly and easily via the industry-standard MQTT protocol. For Android Things-based devices, firmware updates can be automatic.
  • Security out-of-the-box: Secure all device data via industry-standard security protocols. (Combine Cloud IoT Core with Android Things for device operating-system security, as well.) Apply Google Cloud IAM roles to devices to control user access in a fine-grained way.
  • Native integration with analytic services: Ingest all your IoT data so you can manage it as a single system and then easily connect it to our native analytic services (including Google Cloud Dataflow, Google BigQuery and Google Cloud Machine Learning Engine) and partner BI solutions (such as Looker, Qlik, Tableau and Zoomdata). Pinpoint potential problems and uncover solutions using interactive data visualizations, or build rich machine-learning models that reflect how your business works.
  • Auto-managed infrastructure: All this in the form of a fully-managed, pay-as-you-go GCP service, with no infrastructure for you to deploy, scale or manage.

iot-core-2


Posted on

Internet of Things (IoT) Enablement Factors

Internet-of-Things-IoT-enablement-factors

Today we will be talking about the factors that enabled and boosted the Internet of Things (IoT).

1. Miniaturization Of Devices

The size (and cost) of electronic components that are needed to support capabilities such as sensing, tracking and control has been reducing and will continue to reduce as per Moore’s law.

2. Radio Frequency Identification (RFID)

Moving into the future, RFID has the potential to provide streams of data that will provide information systems with real-time, item-specific data and be flexible enough to be placed in extremely small spaces and locations, i.e., coil-on-chip technology.

3. Internet Protocol Version 6 (IPv6)

IPv6 is the next Internet addressing protocol that is used to replace IPv4. With IPv6, there are approximately 3.4×1038 (340 trillion) unique IPv6 addresses, allowing the Internet to continue to grow and innovate.

4. Communication Throughput And Lower Latency

Low latency makes it possible for IOT applications to query or receive quicker updates from sensor devices. LTE networks have latencies about 50-75 ms, which will open up new types of programming possibilities for application developers.

5. Low Power Consumption Devices

Low Power consumption devices will allow the devices to run for longer duration.  Some devices will use solar capability to run, which will be self-sustained.

6. Cloud Computing

IOT connects billions of devices and sensors to create new and innovative applications.  In order to support these applications, a reliable, elastic, and agile platform is essential. Cloud computing is one of the enabling platforms to support IOT, which provides required storage, processing power, and scaling capability.

7. Improved Security And Privacy

This allows the communication channel to be trustworthy. Critical business data can be passed by encryption or authentication code (MAC), protecting the confidentiality and authenticity of transaction data as it “transits” between networks.

There is still evolving standards in IoT security and with IPv6, IPsec support is integrated into the protocol design and connections can be secured when communicating with other IPv6 devices.

UI5CN

Posted on

The Internet of Things: an introduction

Internet of Things IoT Global Economic Value


What is The Internet of Things (IoT) ? What is its value ?

IoT Concept and Examples

The IOT concept was initially coined by a member of the Radio Frequency Identification (RFID) development community in 1999, and it has recently become more relevant to the practical world largely because of the growth of mobile devices, embedded and ubiquitous communication, cloud computing and data analytics.

Since then, many have seized on the phrase “Internet of Things” to refer to the general idea of things, especially everyday objects, that are readable, recognisable, locatable, addressable, and/or controllable via the Internet, irrespective of the communication means (whether via RFID, wireless LAN, wide- area networks, or other means).

Everyday objects include not only the electronic devices we encounter or the products of higher technological development such as vehicles and equipment but things that we do not ordinarily think of as electronic at all – such as food and clothing.

Examples of “things” include:

  • People
  • Animals and Natural ecosystem
  • Location (of objects)
  • Time Information (of objects)
  • Condition (of objects)

These “things” of the real world shall seamlessly integrate into the virtual world, enabling anytime, anywhere connectivity.

Internet of Things (IoT) Global Economic Value

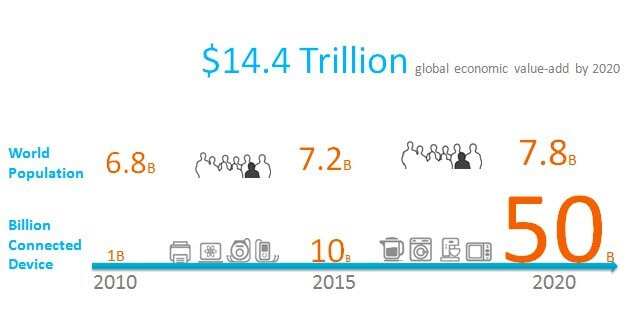
In 2010, the number of everyday physical objects and devices connected to the Internet was around 1 billion.

Cisco forecasts that this figure will reach to 25 billion in 2015 as the number of more smart devices per person increases, and to a further 50 billion by 2020.

In addition, the global economic impact, which IoT will collectively have, will be more than $14 Trillion; if we compare this to the world population, then by 2020 we will have around more than six connected devices per person.

UI5CN

Posted on

SAP HANA Internet of Things (IoT): Raspberry, Arduino Uno, XSJS & SAPUI5: Part 7


SAP HANA IoT and The Internet of Things

If you have not seen yet, double check the introduction, first partsecond partthird partfourth partfifth part and sixth part of this SAP HANA IoT series.

Tying loose ends and going live

All the components are now setup individually and all we need to do is to run them synchronously.

We should double check the URLs of the services, that links Raspberry Pi to SAP HANA system, from the sensor side; and SAP HANA system to SAPUI5, from the front end user’s side.

Let’s go for the go-live.

We are going to open the SAPUI5 app screen and start the Java program that reads the serial data and sends it back to HANA:

SAP-HANA-IoT-with-Arduino-and-Raspberry-Pi-3-750x703


Now, once we start the Java program, we will instantly see the SAPUI5 app starts updating all the sensors data, on near real time basis.

A video result is shown here:


Congratulations we have now a working prototype ready of application leveraging Internet of Things with Raspberry Pi, Arduino Uno, sensors, SAP HANA and SAPUI5.

Posted on

SAP HANA Internet of Things (IoT): Raspberry, Arduino Uno, XSJS & SAPUI5: Part 6


SAP HANA IoT and The Internet of Things

If you have not seen yet, double check the introduction, first partsecond partthird partfourth part and fifth part of this SAP HANA IoT series.

Configuring SAP UI5

We have covered all the steps related to hardware setup and have also configured the backend SAP HANA.

We’ll configure now the UI which is going to show the sensor information.

SAP HANA IoT Internet of Things: Raspberry, Arduino Uno, XSJS & SAPUI5

The UI is simple and we have kept two tiles

The first tile is showing the value of the sensor ie. the LUX value or light intensity. The small window, below the reading value, tells how the sensor looks like (used custom CSS mapping).

We are going to create a simple view and controller and place the tiles in the view.The tiles will be placed in the tile container and the tile container will be returned inside the content of the page.

There are 3 main component here :

  1. Index.html
  2. View
  3. Controller.

Code for the above components are:

Index.html


HANA IoT

<img src="data:image/gif;base64,R0lGODlhAQABAIAAAAAAAP///yH5BAEAAAAALAAAAAABAAEAAAIBRAA7" data-wp-preserve="%3Cscript%3E%2F%2F%20%3C!%5BCDATA%5B%20sap.ui.localResources(%22shiot_ui%22)%3B%20app%20%3D%20new%20sap.m.App(%7BinitialPage%3A%22idshiot_ui1%22%7D)%3B%20var%20page%20%3D%20sap.ui.view(%7Bid%3A%22idshiot_ui1%22%2C%20viewName%3A%22shiot_ui_02.shiot_ui_02%22%2C%20type%3Asap.ui.core.mvc.ViewType.JS%7D)%3B%20app.addPage(page)%3B%20app.placeAt(%22content%22)%3B%20%2F%2F%20%5D%5D%3E%3C%2Fscript%3E" data-mce-resize="false" data-mce-placeholder="1" class="mce-object" width="20" height="20" alt="&lt;script&gt;" title="&lt;script&gt;" />


<div id="splash-screen">


<div class="splash-screen-text">


<div class="en">Welcome to HANA IoT Demo</div>


</div>


<div class="splash-screen-circle-outer"></div>


<div class="splash-screen-circle-inner"></div>


</div>


<img src="data:image/gif;base64,R0lGODlhAQABAIAAAAAAAP///yH5BAEAAAAALAAAAAABAAEAAAIBRAA7" data-wp-preserve="%3Cscript%20id%3D%22sap-ui-bootstrap%22%20src%3D%22https%3A%2F%2Fsapui5.hana.ondemand.com%2Fresources%2Fsap-ui-core.js%22%20data-sap-ui-libs%3D%22sap.m%2Csap.suite.ui.commons%2Csap.ui.core%2Csap.viz%22%20data-sap-ui-theme%3D%22sap_bluecrystal%22%3E%2F%2F%20%3C!%5BCDATA%5B%20%2F%2F%20%5D%5D%3E%3C%2Fscript%3E" data-mce-resize="false" data-mce-placeholder="1" class="mce-object" width="20" height="20" alt="&lt;script&gt;" title="&lt;script&gt;" />

View:


sap.ui.jsview("shiot_ui_02.shiot_ui_02", {

/** Specifies the Controller belonging to this View.

* In the case that it is not implemented, or that "null" is returned, this View does not have a Controller.

* @memberOf shiot_ui_02.shiot_ui_02

*/

getControllerName : function() {

return "shiot_ui_02.shiot_ui_02";

},

/** Is initially called once after the Controller has been instantiated. It is the place where the UI is constructed.

* Since the Controller is given to this method, its event handlers can be attached right away.

* @memberOf shiot_ui_02.shiot_ui_02

*/

createContent : function(oController) {

var content = new sap.suite.ui.commons.NumericContent("idInRateValue", {

size: "S",

scale: "LUX",

value: "{/value}",

valueColor: "Good",

indicator: "{/direction}"

});

var tileContent = new sap.suite.ui.commons.TileContent("idInTileCont", {

unit: "",

size: "L",

content: [

content

]

});

var tileInInfo = new sap.suite.ui.commons.GenericTile("idTileInInfo", {

header: "In",

size: "S",

frameType: "TwoByOne",

tileContent: [

tileContent

]

});

var tileCompr = new sap.suite.ui.commons.GenericTile("idAllGTStatus", {

header: "Compare Level",

size: "L",

scale: "L",

frameType: "TwoByOne",

press: function(){

sap.m.MessageToast.show("Demo");

},

tileContent: [

new sap.suite.ui.commons.TileContent("idDaysComprDash", {

size: "S",

scale: "S",

content: [

new sap.suite.ui.commons.ComparisonChart("idDaysCompr", {

size: "XS",

width: "18rem",

data: [

new sap.suite.ui.commons.ComparisonData({

title: "Maximum Limit",

value: "{/comparisonValue1}",

color: sap.suite.ui.commons.InfoTileValueColor.Error

}),

new sap.suite.ui.commons.ComparisonData({

title: "Current",

value: "{/comparisonValue2}",

color: sap.suite.ui.commons.InfoTileValueColor.Critical

}),new sap.suite.ui.commons.ComparisonData({

title: "Mimumim Limit",

value: "{/comparisonValue3}",

color: sap.suite.ui.commons.InfoTileValueColor.Good

})

]

})

]

})

]

});

tileCompr.addStyleClass("sapMTile backGroundWhite");

var custeReading = new sap.m.CustomTile({

content: [

tileContent

]

});

var custeCompare = new sap.m.CustomTile({

content: [

tileCompr

]

});

var tileContainer = new sap.m.TileContainer("idMainTiles", {

tiles: [

custeReading,

custeCompare

]

});

//Polling implementation

setInterval(oController.changeKPITest, 1000 * 3);

// create the page holding the List

var page1 = new sap.m.Page({

title: "HANA IoT KPI",

enableScrolling: false,

content : [

tileContainer

]

});

return page1;

}

});

Controller:


sap.ui.controller("shiot_ui_02.shiot_ui_02", {

/**

* Called when a controller is instantiated and its View controls (if available) are already created.

* Can be used to modify the View before it is displayed, to bind event handlers and do other one-time initialization.

* @memberOf shiot_ui_02.shiot_ui_02

*/

//onInit: function() {

//

//},

/**

* Similar to onAfterRendering, but this hook is invoked before the controller's View is re-rendered

* (NOT before the first rendering! onInit() is used for that one!).

* @memberOf shiot_ui_02.shiot_ui_02

*/

onBeforeRendering: function() {

var data =     {

"value": 0,

"direction": "Down",

"comparisonValue1": 0,

"comparisonValue2": 0,

"comparisonValue3": 0

};

var oModel = new sap.ui.model.json.JSONModel();

oModel.setData(data);

sap.ui.getCore().setModel(oModel);

},

//Triggers automatically for display test

changeKPITest: function(){

/*var min = 0;

var max = 100;

var newRandomreading = Math.floor(Math.random() * (max - min)) + min;*/

var url = "http:///demoApp/demo01/app01/services/getSensorReading.xsjs?id=";

var _SENSORID = "A001";

var _MAXLIMIT = 170;

var _MINLIMIT = 25;

var data =     {

"value": 0,

"direction": "Down",

"comparisonValue1": _MAXLIMIT,

"comparisonValue2": 0,

"comparisonValue3": _MINLIMIT

};

var oModel;

var newColorCode;

//for now hardcoding the sensor ID

url = url + _SENSORID;

//Doing the asyn call to HANA system

jQuery.ajax({

url: url,

async: true,

dataType: 'json',

type: 'GET',

success: function(oData) {

if (!oData) {

sap.m.MessageToast.show("Not able to get Data");

} else {

data["value"] = oData["value"];

data["comparisonValue2"] = oData["value"];

oModel =  sap.ui.getCore().getModel();

if(oModel.getData()["comparisonValue2"] &gt; data["comparisonValue2"]){

data["direction"] = "Down";

}else{

data["direction"] = "Up";

}

oModel.setData(data);

oModel.refresh();

//changing the color as well

newColorCode = parseInt(data["value"])*2  ;

if(newColorCode &gt; 255){

newColorCode = 255;

}

$('#idInTileCont-footer-text').css("background-color", "rgba("+newColorCode+", "+newColorCode+", "+newColorCode+", 0.99)");

}

},

error: function(XMLHttpRequest, textStatus, errorThrown) {

sap.m.MessageToast.show("Connection not able to establish");

}

});

},

/**

* Called when the View has been rendered (so its HTML is part of the document). Post-rendering manipulations of the HTML could be done here.

* This hook is the same one that SAPUI5 controls get after being rendered.

* @memberOf shiot_ui_02.shiot_ui_02

*/

//onAfterRendering: function() {

//

//},

/**

* Called when the Controller is destroyed. Use this one to free resources and finalize activities.

* @memberOf shiot_ui_02.shiot_ui_02

*/

//onExit: function() {

//

//}

});

Here the controller function changeKPITest is polled every 3 sec and we have the new data bound to model, which is returned from SAP HANA XSJS AJAX call .

It is better to have a push notification feature in here instead of polling which, is called web-­­sockets, but for simplicity purpose we have kept the configuration minimal.

In part 7, we are tying the loose ends and going live.

UI5CN

UI5CN