Posted on

SAPĀ® FioriĀ® Elements with SAPĀ® CAPM App


Learn to Create and Use SAP® CAPM Apps with SAP® BAS!

Hey there, SAP® Tech Masterminds! We’re thrilled to bring you a fun and easy two-part blog series. We’ll guide you through creating and using SAP® CAPM Services in SAP® BAS for your SAP® Fiori® Element Apps.
Whether you’re new to coding or a seasoned expert, these blogs are for you. Let’s get started!


Part 1: SAP® Fiori® Elements with SAP® CAPM App – Sample SAP® CAPM App

Imagine you, a cozy drink, and your laptop. Now, follow the simple steps to create your simple SAP® CAPM app. In this first blog, you’ll learn:

  • Step-by-step instructions to build your SAP® CAPM App and its oData V4 services.
  • You can perform these steps in SAP® BAS IDE.


Part 2: SAP® Fiori® Elements with SAP® CAPM App – SAP® Fiori® Element App

Now that you’ve built your SAP® CAPM app, it’s time to put it to work. In the second part of our series, we’ll show you how to:

  • Connect your CAPM services to SAP® Fiori® Elements apps.
  • Turn your services into awesome, user-friendly apps using SAP® Fiori® Elements.
  • Follow simple, clear instructions to make everything work smoothly.

So grab your favorite snack, get comfy, and join us on this coding adventure. Stay tuned for the first part – it’s going to be amazing!


Also, to Learn Fiori® Elements using SAP® CAPM and SAP® RAP you can enroll in the course Learn SAP® Fiori® Elements where we will learn in a Step-by-Step Fashion the development of Apps Using Fiori® Elements.

For the best offers on the course check the Offer Page.


Posted on

SAPĀ® FioriĀ® Elements with SAPĀ® CAPM App – SAPĀ®Ā FioriĀ® Element App

In this Blog, you will see how to use the CAPM App Service created in the last section and create a SAP® Fiori® Elements App.


Table of Contents:

Start the Series from: SAP® Fiori® Elements with SAP® CAPM App

Go to last the Blog from: Sample SAP® CAPM App Setup

Go to the Course from: Learn SAP® Fiori® Elements from


1. Create Fiori® Element App

Create a Fiori® Element App from the Template in SAP® BAS using the below steps:

  • Select List Report Template Using File > New Project From Template [Screenshot below]
  • In the Data Source Screen, select Local CAP Project > Project > Catalog service [Screenshot below]
  • In the next screen select the Products Entity
  • In the next screen keep everything default and select Finish
  • The SAPUI5 App will be created inside the CAPM project app folder


Selection of List Report Template


Service Selection SAP® CAPM


2. Start Script

After that you will find the script to run the project from the root with the command:

npm run [start-or-watch]


3. Add Line Item

Now add LineItem annotations in the Service:

annotate CatalogService.Products with @(

   UI: {
      LineItem: [
{ Value: productName },
{ Value: category },
{ Value: price }
      ] 
    ]
   }
);

This will show 3 columns productName, category and price.


Add Line Item Annotations to the Service
Output of LineItems Annotations

Similarly, now we can add more Annotations using the codes below.

4. HeaderInfo:

Now in the same service file, we can change the default Label of what Kind of Items is shown from Product or Products in the Header columns.

HeaderInfo: {

            TypeName: 'Item',

            TypeNamePlural: 'Items',

        }

5. Header Details

Now to add navigation, we can show the image, title and description for the below code:

    HeaderInfo: {

            TypeName: 'Item',

            TypeNamePlural: 'Items',

      TypeImageUrl: image,

            Title: {

                $Type: 'UI.DataField',

                Value: productName,

                Label: 'Product'
            },

            Description: {

                $Type: 'UI.DataField',

                Value: price

            }

          }

6. FieldGroup

We can also Group together different fields using FieldGroup and show them together:

FieldGroup #Overview: {

          $Type : 'UI.FieldGroupType',

          Label: 'Overview',

          Data: [

            {

            $Type: 'UI.DataField',

            Value: productName

            },

            {

            $Type: 'UI.DataField',

            Value: price

            }

          ]

        }


7. Facets Using FieldGroup

Also, we can add many FieldGroup using Facets to the Screen with different tabs with the below codes:

Facets: [
                     {

                          $Type : 'UI.ReferenceFacet',

                          Label:'Overview',

                         Target: '@UI.FieldGroup#Overview'

                        },

                        {

                          $Type : 'UI.ReferenceFacet',

                          Label:'Tech Details',

                         Target: '@UI.FieldGroup#TechDetail'

                        }

         ]

Tabs will be created and different Groups will have information on the Fields associated with the Group.

8. Nesting of Facets


Now we can also use Collection Facets to Nest multiple Facets Together.


Here you will see that the collection doesn’t create tabs but groups them together.


Note: It is mandatory to define an ID for collection facets but optional for reference facets.

           Facets: [
                        {

                          $Type : 'UI.CollectionFacet',

                          ID    : 'FacetIdentifier1',

                          Label:'Read Overview',

                              Facets  : [

                                {

                                  $Type : 'UI.ReferenceFacet',

                                  Label:'Overview',

                                  Target: '@UI.FieldGroup#Overview'

                                },

                                {

                                $Type : 'UI.ReferenceFacet',

                                Label:'Tech Details',

                                Target: '@UI.FieldGroup#TechDetail'

                              }

                          ]

                        }

              ]


Also, you can make two collection Facets and have details within each other

Facets: [
                     {

                          $Type : 'UI.CollectionFacet',

                          ID    : 'FacetIdentifier1',

                          Label:'Read Overview',

                              Facets  : [

                                {

                                  $Type : 'UI.ReferenceFacet',

                                  Label:'Overview',

                                  Target: '@UI.FieldGroup#Overview'

                                }

                          ]

                        },

                        {

                          $Type : 'UI.CollectionFacet',

                          ID    : 'FacetIdentifier2',

                          Label:'Read Overview',

                              Facets  : [

                                {

                                $Type : 'UI.ReferenceFacet',

                                Label:'Tech Details',

                                Target: '@UI.FieldGroup#TechDetail'

                              }

                          ]

                        }

              ]


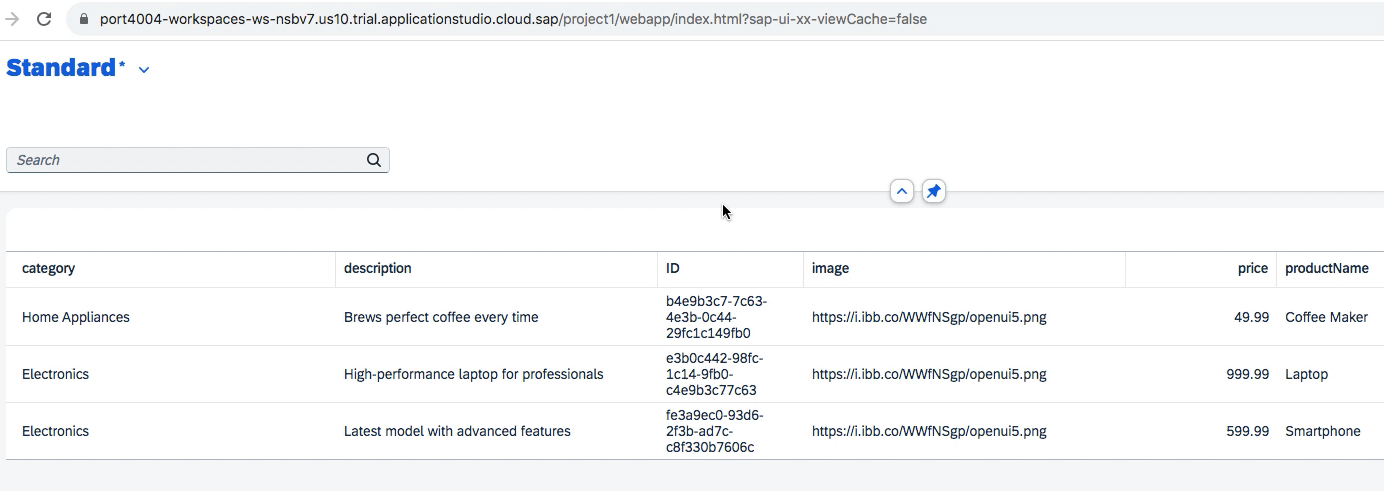
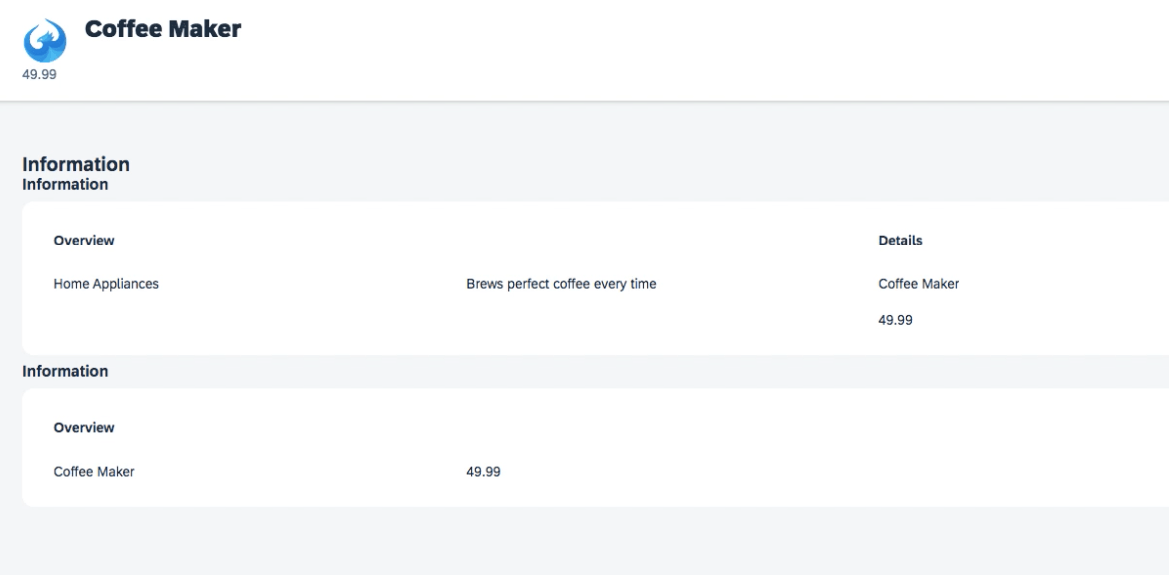
The final result will look similar to the screenshot below in the Navigation Details Screen. Based on the Nesting of Navigation the Final Result will differ.

Fiori® Elements Navigation Screen


Good practice is:

1. Not do the nesting more than 3 levels.

2. Not referencing more than 1 Reference Facets per collection or you will face rendering issues.


Posted on

SAPĀ® FioriĀ® Elements with SAPĀ® CAPM App – Sample SAPĀ® CAPM App Setup

In this blog, you will see how to set up the setup SAP® CAPM App in SAP® BAS:


Table of Contents:

Start the Series from: SAP® Fiori® Elements with SAP® CAPM App

Go to the next Blog from: SAP® Fiori® Elements with SAP® CAPM App – Fiori® Element App

Go to the Course from: Learn SAP® Fiori® Elements from


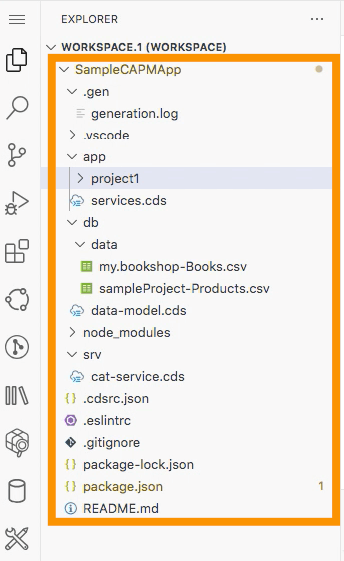
1. Create a SAP® CAPM Project to generate sample files and structure. In the BAS CLI you can write:

cds init sample-project

Some of the files created in the project like the data CSV file and the app folder will be added in the coming steps:

SAP® CAPM Project creation


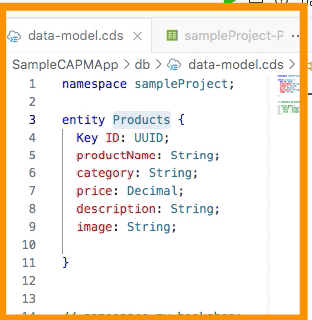
2. Go to the db folder and create a file data-models.cds to add the schema:

namespace sampleProject;

entity Products {
  key ID: UUID;
  productName: String;
  category : String;
  price : Decimal;
  description : String; // New field for product description
  image : String; // New field for image URL
}

3. Add sample data values inside the data folder in a CSV file and name it project-Products.csv:

ID;productName;category;price;description;image
"e3b0c442-98fc-1c14-9fb0-c4e9b3c77c63";"Laptop";"Electronics";999.99;"High-performance laptop for professionals";"https://i.ibb.co/WWfNSgp/openui5.png"
"fe3a9ec0-93d6-2f3b-ad7c-c8f330b7606c";"Smartphone";"Electronics";599.99;"Latest model with advanced features";"https://i.ibb.co/WWfNSgp/openui5.png"
"b4e9b3c7-7c63-4e3b-0c44-29fc1c149fb0";"Coffee Maker";"Home Appliances";49.99;"Brews perfect coffee every time";"https://i.ibb.co/WWfNSgp/openui5.png"
SAP® CAPM Data Model


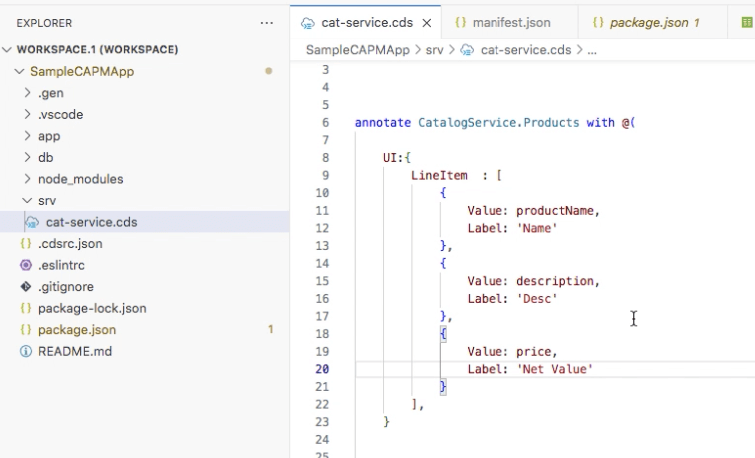
4. Create a basic service inside the srv folder in the file catalog-service.cds :

using sampleProject from '../db/data-model';
service CatalogService {
entity Products as projection on sampleProject.Products;
}


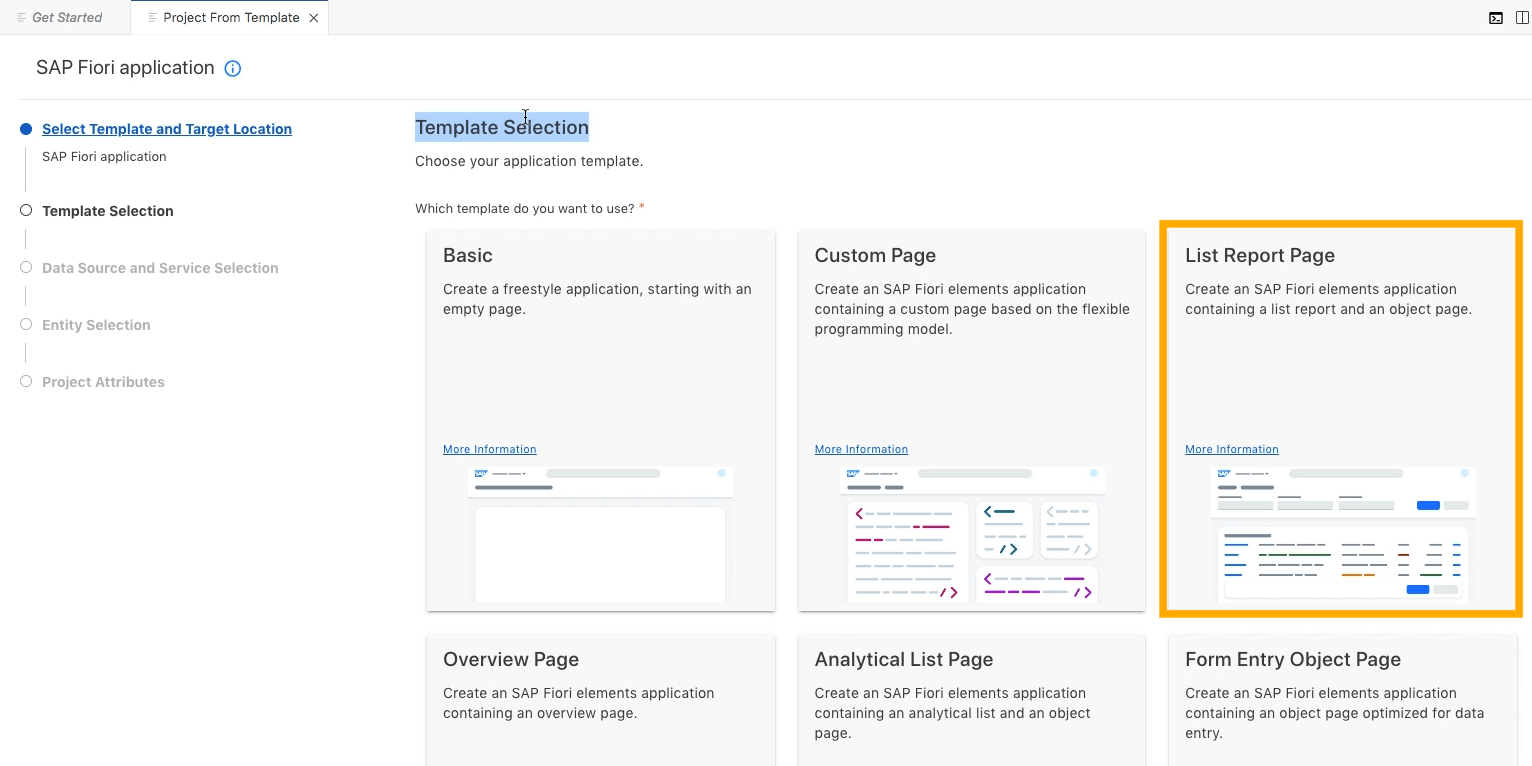
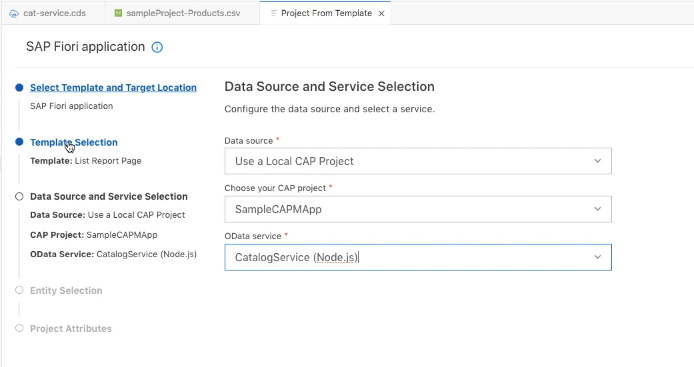
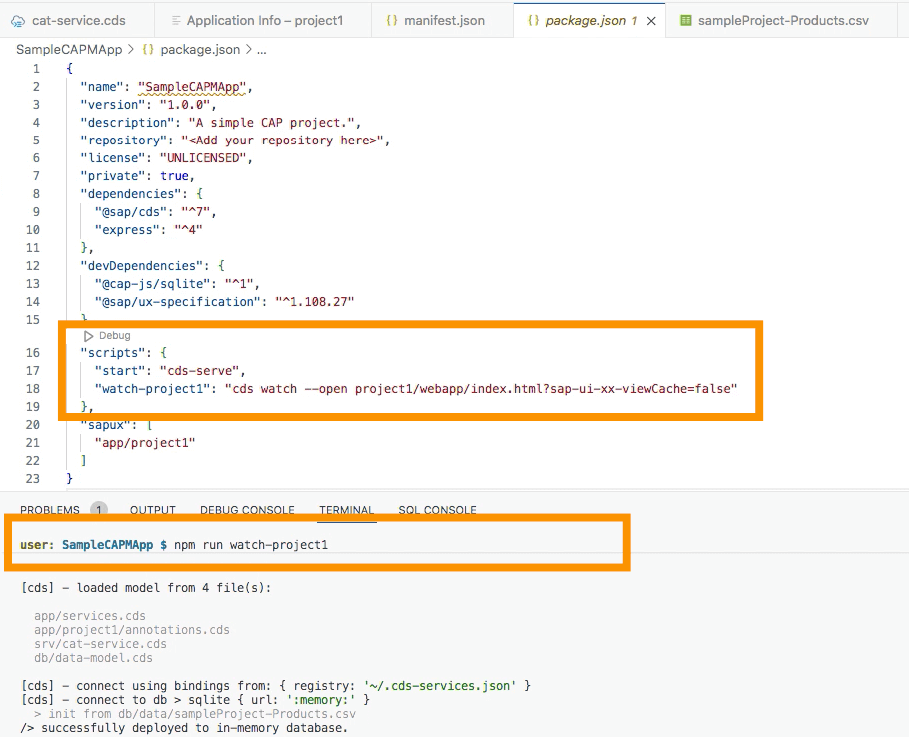
5. We have created a SAP® CAPM App to explore which can be used in a Fiori® Element Template, so let’s start making that.
Note, that this SAP® CAPM App will be used in the Fiori® Element Template, so we need to keep the App running and create a new Project From Template which we will do next.

To run the App we can use the Start Script of the App from the package.json file:

npm run start

or

npm run [watch-project-name]

Running SAP® CAPM App

Posted on

5 Steps to Bind Service to Application in SAPĀ®Ā BTP

SAP® BTP Blogs Series Covers:

  1. 5 Simple Steps to Setup and Get Started with SAP® BTP
  2. 5 Steps to Deploy Application in SAP® BTP
  3. 5 Steps to Bind Service to Application in SAP® BTP

This blog is a part of the End-to-End SAP® BTP and Cloud Bundle


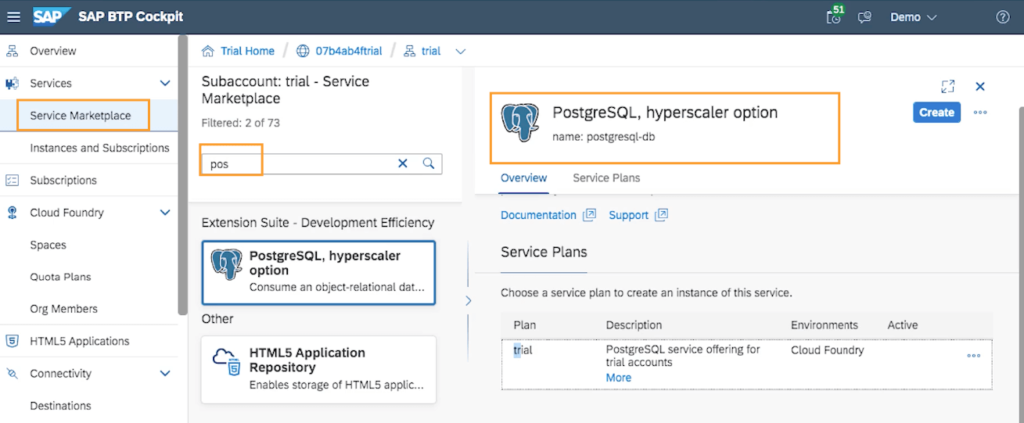
  1. Choose a Service:Choose a service from the SAP® BTP marketplace that you want to bind to your application.For example a Database(DB) service like PostgreSQL.

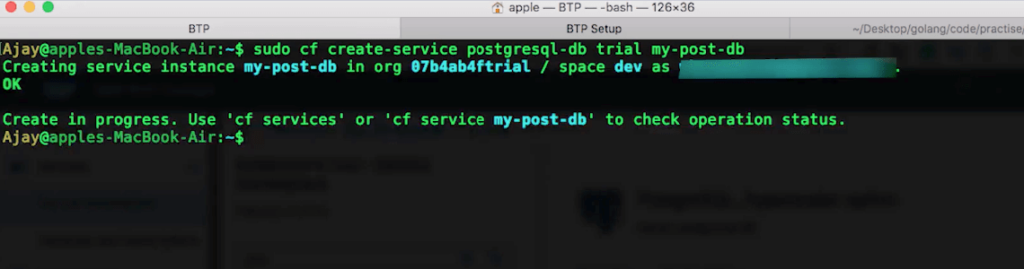
  2. Create a Service Instance:Create a service instance of the chosen service in your SAP® BTP space. With CF CLI we can use the command
    cf create-service [service-name] trial [name-given-to-instance]

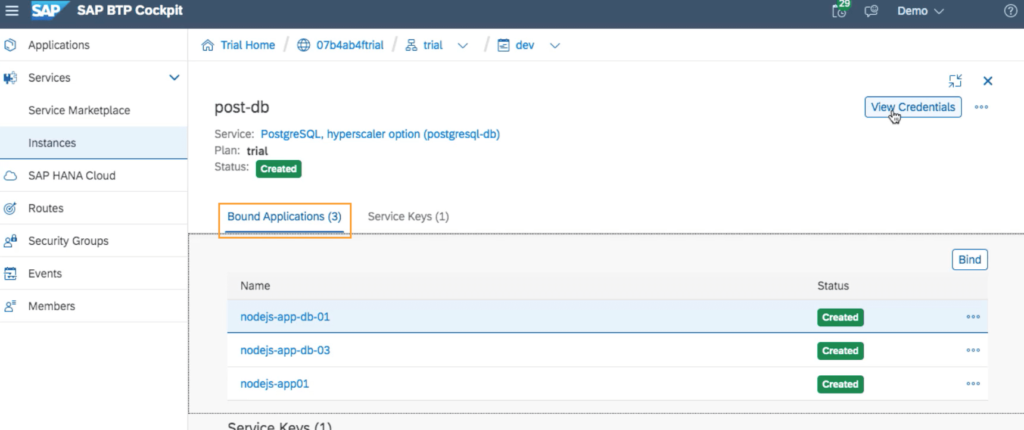
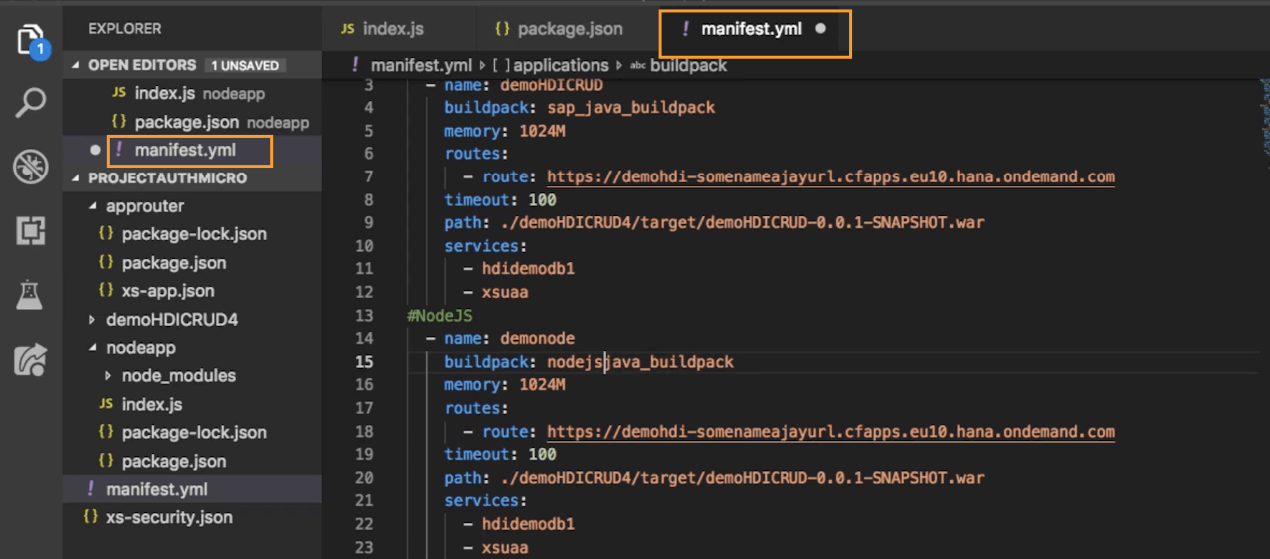
  3. Bind the Service:Bind the service Instance to your Application, by using the Cloud Foundry CLI or the SAP® BTP cockpit to bind the service instance manually. Also, service-binding can be done by passing service information with the Manifest.YML file.

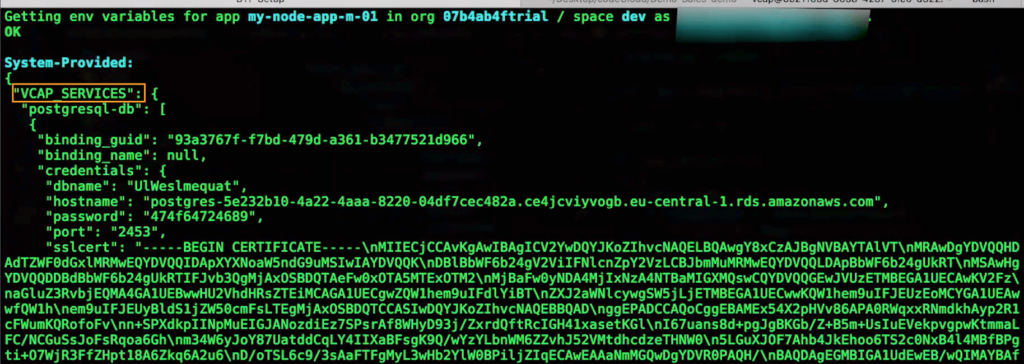
  4. VCAP Variable:VCAP is an environment variable in a JSON data format that is provided to an Application when it is hosted in Cloud Foundry (SAP® BTP), this variable act as a way to share the information that the application needs to connect to the service instance.

  5. Use the ServiceOnce the Service is Bound you will get the required credentials to connect to the service via VCAP environment variable. After the connection to the service, you can use the service instance. Based on the service if it is a Database, server, messaging queue, etc. the operation related to connecting and usage will be different, which needs to be handled accordingly in the application.
Posted on

5 Steps to Deploy Application in SAPĀ®Ā BTP

SAP® BTP Blogs Series Covers:

  1. 5 Simple Steps to Setup and Get Started with SAP® BTP
  2. 5 Steps to Deploy Application in SAP® BTP
  3. 5 Steps to Bind Service to Application in SAP® BTP

This blog is a part of the End-to-End SAP® BTP and Cloud Bundle


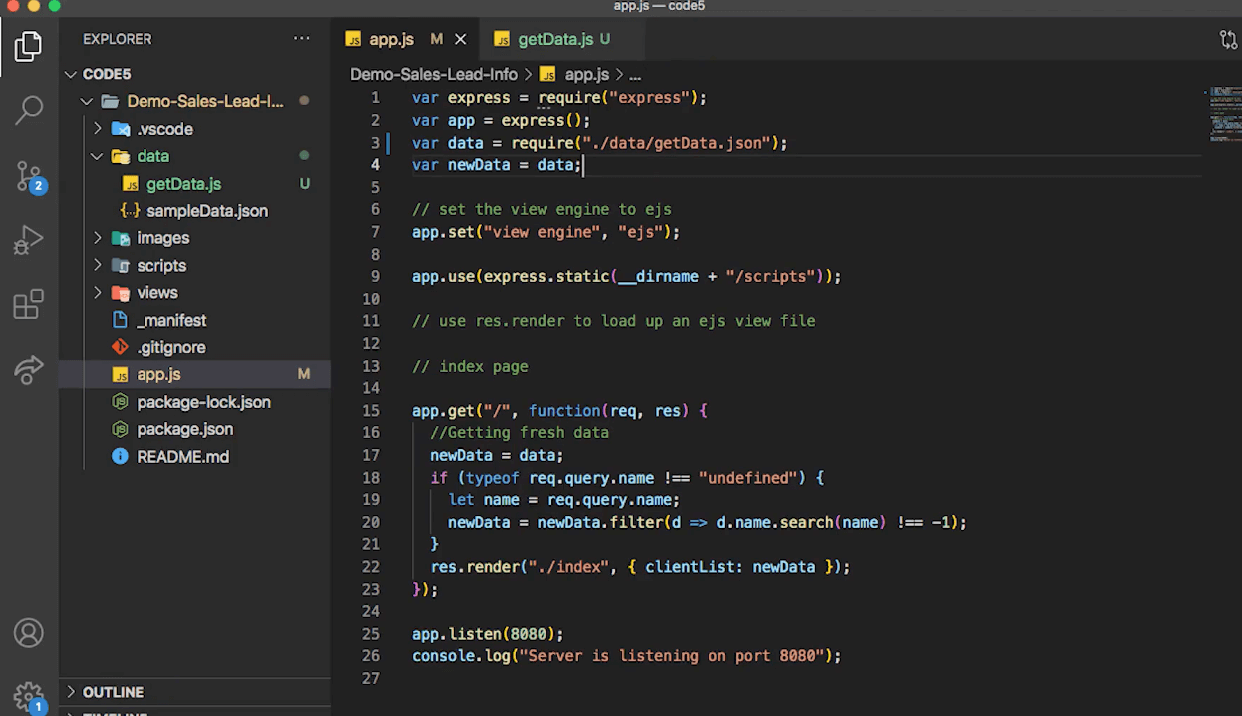
  1. Prepare your Application: Make sure your application is ready to be deployed and meets the requirements for deployment to SAP® BTP.
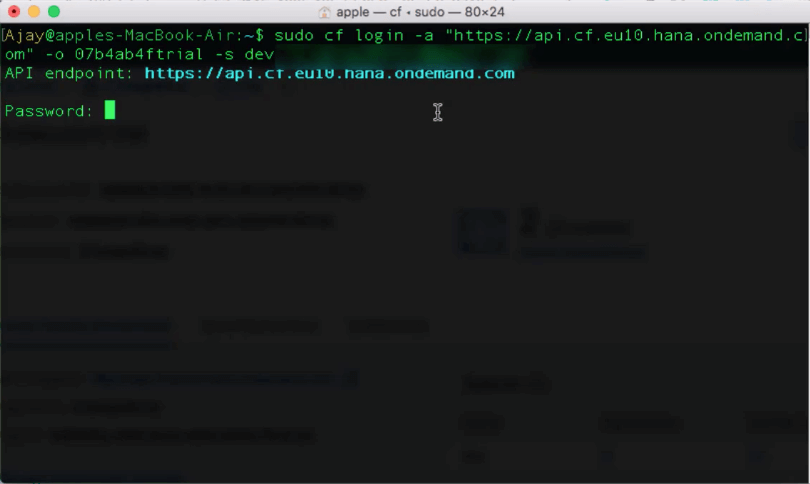
  2. Connect to SAP® BTP: Connect to the SAP® BTP environment using a Cloud Foundry CLI or a Web-based interface.Login to CF CLI Using:
    cf login -a [API-END] -o [ORG] -s [Space]

    After that, one needs to enter the prompt password in CLI.

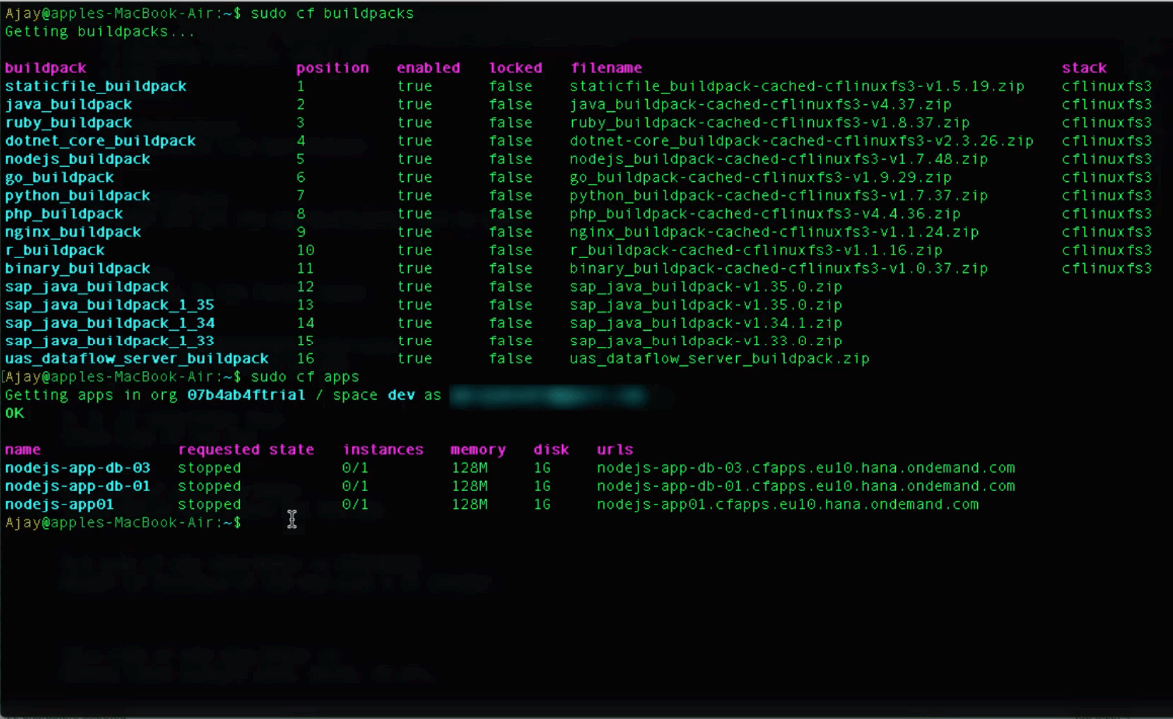
  3. Choose a Deployment Method: Decide on a deployment method using the Cloud Foundry CLI or a web-based interface such as the SAP® BTP cockpit. Application Buildpack needs to be also checked if the runtime environment that the Application needs is present. To check available buildpacks use command:
    cf buildpack


  4. Create a Deployment Descriptor: Create a deployment descriptor, such as a manifest(YAML or YML) file, that specifies the configuration for your application.
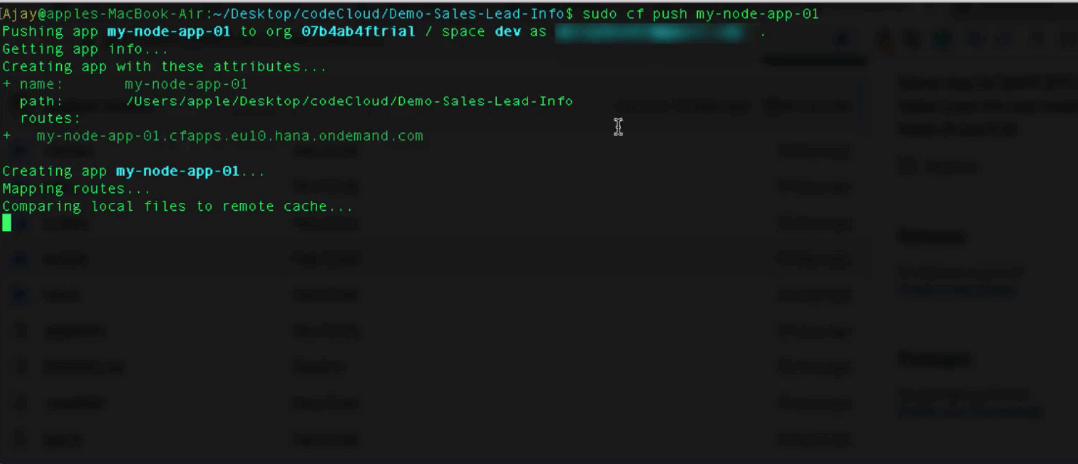
  5. Deploy and Monitor App: Use below CLI command below to Push the Application to SAP® BTP
    cf push [App-Name]