Posted on

SAP HANA Internet of Things (IoT): Raspberry, Arduino Uno, XSJS & SAPUI5: Part 5


SAP HANA IoT and The Internet of Things

If you have not seen yet, double check the introduction, first partsecond partthird part and fourth part of this SAP HANA IoT series.

We have already covered all the steps related to hardware setup and configuration.

We are going now to focus our attention on SAP HANA and interfacing it with our SAP UI5 frontend.

We are going to cover the SAP HANA setup in this part and SAPUI5 setup in part 6 of the series:

SAP HANA IoT Internet of Things (IoT): Raspberry, Arduino Uno, XSJS & SAPUI5
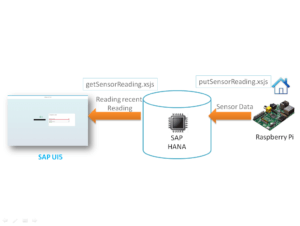
Steps which we are going to follow for configuring SAP HANA

Step1: Create the Data Definition for our HANA XS which will be storing the data.

Step2: Create the SQL procedures to do data operations.

Step3: Create the XSJS services to act as a Gateway between the SQL Procedures calls and the service calls for Raspberry Pi and SAPUI5 application.

Step1 – Create the Data Definition for HANA XS

We  are going to name it Demo Schema .hdbschema. Note here that demoApp.demo01.app02 is the package path and SHIOT_02 is the project name:


namespace demoApp.demo01.app02.SHIOT_02.Data;

@Schema: 'DemoSchema'

context demo02sensorNetwork {

type sensor_key : String(10);

@Schema: 'DemoSchema'

context demo02sensorNetwork {

type sensor_key : String(10);

@Catalog.tableType : #COLUMN

Entity demo02sensor_info_MD {

key ID: sensor_key;

DESC: String(200);

};

@Catalog.tableType : #COLUMN

Entity demo02sensor_active_TS {

key ID: sensor_key;

key time_stamp: UTCTimestamp;

value : Integer;

};

Once you have activate the code, you need to create two tables demo02sensor_active_TS and demo02sensor_info_MD .

demo02sensor_active_TS: Stores the transactional Data of the sensors (readings with timestamp).

demo02sensor_info_MD: Stores the Master Data of the sensors (Sensor Id’s)

Step2 – Create the SQL procedures to do data operations

We have to create two SQL procedures for data operations: insert_sensor_reading.hdbprocedure and sensor_read.hdbprocedure.

As the names suggest, the  first one is going to insert sensor data in sensor table and second one is going to read the recent sensor data from the table.

insert_sensor_reading.hdbprocedure is inside the folder Procedures. It is taking sensor ID and sensor Reading as input:

PROCEDURE


"DemoSchema"."demoApp.demo01.app02.SHIOT_02.Procedures::insert_sensor_reading" (

IN SENSORID NVARCHAR(10),

IN sensor_reading INTEGER )

LANGUAGE SQLSCRIPT AS

BEGIN

/*****************************

Inserting sensor Data

*****************************/

insert into "demoApp.demo01.app02.SHIOT_02.Data::demos02sensorNetwork.demo02sensor_active_TS"

VALUES(:SENSORID, CURRENT_TIMESTAMP , sensor_reading

);

END;

sensor_read.hdbprocedure is inside the folder Procedures. It is taking sensor ID as input and returns one data set of demo02sensor_active_TS.

PROCEDURE


"DemoSchema"."demoApp.demo01.app02.SHIOT_02.Procedures::sensor_read(

IN id NVARCHAR(10),

OUT result "DemoSchema"."demoApp.demo01.app02.SHIOT_02.Data::demo02sensorNetwork.demo02sensor_active_TS")

LANGUAGE SQLSCRIPT

SQL SECURITY INVOKER

--DEFAULT SCHEMA

READS SQL DATA <u>AS</u>

BEGIN

/*****************************

Reading sensors Data

*****************************/

result = select *

from "DemoSchema"."demoApp.demo01.app02.SHIOT_02.Data::demo02sensorNetwork.demo02sensor_active_TS"

where "ID" = :id and "time_stamp" = (select max("time_stamp") from

"DemoSchema"."demoApp.demo01.app02.SHIOT_02.Data::demo02sensorNetwork.demo02sensor_active_TS"

where "ID"= :id);

END;

Step3: Create the XSJS services

Create the XSJS services to act as a Gateway between the SQL Procedures calls and the service calls for Raspberry Pi and SAP UI5 application:

We have two services.

The first one is getSensorReading.xsjs which reads the recent sensor reading for the sensor id, passed in the URL. It uses sensor_read.hdbprocedure for database call.


var sensorId = $.request.parameters.get("id");

var body = "error";

var data ={

"id":"error",

"timestamp":"error",

"value":0

};

body = sensorId;

if(sensorId === undefined){

$.response.setBody( "Invalid key !!!");

}

else{

$.response.contentType = "text/plain";

$.response.setBody(sensorId);

try {

var conn = $.db.getConnection();

var query = 'call \"demoApp.demo01.app02.SHIOT_02.Procedures::sensor_read\"(?,?)';

var cst = conn.prepareCall(query);

cst.setString(1, sensorId);

var rs = cst.execute();

conn.commit();

rs = cst.getResultSet();

while(rs.next()){

data.id = rs.getNString(1);

data.timestamp= rs.getTimestamp(2) ;

data.value= rs.getInteger(3);

}

body = JSON.stringify(data);

conn.close();

} catch (e) {

body = e.stack + "\nName:"+ e.name+"\nMsg" + e.message;

$.response.status = $.net.http.BAD_REQUEST;

}

}

$.response.contentType = "text/plain";

$.response.setBody(body);

Then after that, we use putSensorReading.xsjs which reads the recent sensor reading for the sensor id and sensor value passed in the URL. It uses insert_sensor_reading.hdbprocedure for database call to store the data.


var sensorId = $.request.parameters.get("id");

var sensorReading = $.request.parameters.get("value");

sensorReading = parseInt(sensorReading,10);

var body = "error";

if(sensorId === undefined){

$.response.setBody( "Invalid key !!!");

}

else{

$.response.contentType = "text/plain";

$.response.setBody(sensorId);

try {

var conn = $.db.getConnection();

var query = 'call \"demoApp.demo01.app02.SHIOT_02.Procedures::insert_sensor_reading\"(?,?)';

var cst = conn.prepareCall(query);

cst.setString(1, sensorId);

cst.setInteger(2, sensorReading);

var rs = cst.execute();

conn.commit();

//as no record returned

if(rs == 0){

body = true;

}

conn.close();

} catch (e) {

body = e.stack + "\nName:"+ e.name+"\nMsg" + e.message;

$.response.status = $.net.http.BAD_REQUEST;

}

}

$.response.contentType = "text/plain";

$.response.setBody(body);

In the real world setup we need also to assign the security key to each sensor and pass it to verify the readings.

Also it would be better to have the timestamp taken from the sensor source and store it in the database but for keeping the coding and complexity minimum we are focusing on the core steps.

In part 6, we are going to setup the SAPUI5 App and integrate it with the backend.

UI5CN

Posted on

SAP HANA Internet of Things (IoT): Raspberry, Arduino Uno, XSJS & SAPUI5: Part 4


SAP HANA IoT and The Internet of Things

SAP HANA IoT Internet of Things: Raspberry, Arduino Uno, XSJS & SAPUI5

If you have not seen yet, double check the introduction, first partsecond part and third part of this SAP HANA IoT series.

Today, in this article we are going to perform:

Step 3 – Using Java in Raspberry Pi in order to read serial data of Arduino

This part is the most challenging part for someone who is new to Raspberry Pi, so we have decided to create the entire setup in the utmost simplistic way in 5 sub-steps:

Step 1: Install java in the Raspberry Pi.

Usually Raspbian comes with Java installed but you can still check it via the following command:

 java -version

When you update your Raspbian, it will also update the Java library, if required.

sudo apt-get update

Step 2: The communication is in serial mode, between Arduino and Raspberry Pi, so we need a way to make our Java program to understand it. So Download the below files :

  • libjawt.so from here
  • librxtxSerial.so from here
  • RXTXcomm.jar from here

and go to the download folder of the files and type below commands:
sudo cp libjawt.so /usr/lib/jvm/jdk-8-oracle-arm-vfp-hflt/lib/arm
sudo cp RXTXcomm.jar /usr/lib/jvm/jdk-8-oracle-arm-vfp-hflt/jre/lib
sudo cp librxtxSerial.so /usr/lib/jvm/jdk-8-oracle-arm-vfp-hflt/lib/arm
sudo cp librxtxSerial.so /usr/lib/jni/                                                    

Now, we are assuming here that you have your jdk-8-oracle-arm-vfp-hflt inside your /usr/lib/jvm. If you don’t, then your Java won’t be updated to jdk-8 and you have to update the JDK and JRE .

sudo apt-get install oracle-java8-installer

Step 3: Now you can copy below Java code.

import java.io.BufferedReader;
import java.io.InputStreamReader;
import java.io.OutputStream;
import gnu.io.CommPortIdentifier;
import gnu.io.SerialPort;
import gnu.io.SerialPortEvent;
import gnu.io.SerialPortEventListener;
import java.util.Enumeration;
import java.net.HttpURLConnection;
import java.net.URL;

public class SerialTestGET implements SerialPortEventListener {
SerialPort serialPort;
static int sensorValue = 0;
/** The port we're normally going to use. */
private static final String PORT_NAMES[] = {
"/dev/tty.usbserial-A9007UX1", // Mac OS X
"/dev/ttyACM0", // Raspberry Pi
"/dev/ttyUSB0", // Linux
"COM3", // Windows
};
/**
* A BufferedReader which will be fed by a InputStreamReader
* converting the bytes into characters
* making the displayed results codepage independent
*/
private BufferedReader input;
/** The output stream to the port */
private OutputStream output;
/** Milliseconds to block while waiting for port open */
private static final int TIME_OUT = 2000;
/** Default bits per second for COM port. */
private static final int DATA_RATE = 9600;

public void initialize() {
// the next line is for Raspberry Pi and
// gets us into the while loop and was suggested here was suggested http://www.raspberrypi.org/phpBB3/viewtopic.php?f=81&t=32186
System.setProperty("gnu.io.rxtx.SerialPorts", "/dev/ttyACM0");

CommPortIdentifier portId = null;
Enumeration portEnum = CommPortIdentifier.getPortIdentifiers();

//First, Find an instance of serial port as set in PORT_NAMES.
while (portEnum.hasMoreElements()) {
CommPortIdentifier currPortId = (CommPortIdentifier) portEnum.nextElement();
for (String portName : PORT_NAMES) {
if (currPortId.getName().equals(portName)) {
portId = currPortId;
break;
}
}
}
if (portId == null) {
System.out.println("Could not find COM port.");
return;
}

try {
// open serial port, and use class name for the appName.
serialPort = (SerialPort) portId.open(this.getClass().getName(),
TIME_OUT);

// set port parameters
serialPort.setSerialPortParams(DATA_RATE,
SerialPort.DATABITS_8,
SerialPort.STOPBITS_1,
SerialPort.PARITY_NONE);

// open the streams
input = new BufferedReader(new InputStreamReader(serialPort.getInputStream()));
output = serialPort.getOutputStream();

// add event listeners
serialPort.addEventListener(this);
serialPort.notifyOnDataAvailable(true);
} catch (Exception e) {
System.err.println(e.toString());
}
}

/**
* This should be called when you stop using the port.
* This will prevent port locking on platforms like Linux.
*/
public synchronized void close() {
if (serialPort != null) {
serialPort.removeEventListener();
serialPort.close();
}
}

/**
* Handle an event on the serial port. Read the data and print it.
*/
public synchronized void serialEvent(SerialPortEvent oEvent) {
if (oEvent.getEventType() == SerialPortEvent.DATA_AVAILABLE) {
try {
String inputLine=input.readLine();
//System.out.println(inputLine);
sendGet(inputLine);
} catch (Exception e) {
System.err.println(e.toString());
serialPort.removeEventListener();
serialPort.close();
}
}
// Ignore all the other eventTypes, but you should consider the other ones.
}

// HTTP GET request
public void sendGet(String inputLine) throws Exception {

try{
//if difference is more than 3 then send data to SAP HANA
if(inputLine != null && inputLine .length() > 0 && Math.abs(sensorValue - Integer.parseInt(inputLine)) > 3 ){

sensorValue = Integer.parseInt(inputLine);
//Considering that A001 sensor is connection with this raspberry pie for now
//we can even pass this with command line but for simplicityhardcoding it
//Replace with your HANA server URL and port number
String url = "http:///demoApp/demo01/app01/services/putSensorReading.xsjs?id=A001&value=";
url = url + inputLine;

URL obj = new URL(url);
HttpURLConnection con = (HttpURLConnection) obj.openConnection();

// optional default is GET
con.setRequestMethod("GET");

//add request header
//con.setRequestProperty("User-Agent", USER_AGENT);

int responseCode = con.getResponseCode();
if(responseCode == 200){
System.out.println("OK value:"+inputLine);
}else{
System.out.println("Error: Response code "+responseCode);
}

}
System.out.println("OK value: Less than 3");
}catch (Exception e) {
System.err.println(e.toString());
serialPort.removeEventListener();
serialPort.close();
}

}

public static void main(String[] args) throws Exception {
SerialTestGET main = new SerialTestGET();
main.initialize();

Thread t=new Thread() {
public void run() {
//the following line will keep this app alive for 1000 seconds,
//waiting for events to occur and responding to them (printing incoming messages to console).
try {Thread.sleep(1000000);} catch (InterruptedException ie) {}
}
};
t.start();
System.out.println("Started");
}
}

Step 4: Compile it using below command:

javac -source 1.6 -target 1.6 -cp /usr/lib/jvm/jdk-8-oracle-arm-vfp-hflt/jre/lib/RXTXcomm.jar SerialTestGET.java

Here, we are giving a class path of our RXTX.jar file and using 1.6 compatible compiler mode because the Jar file is 1.6 compatible.

Step 5: If there is no error (warnings may come), then your setup is right and you can now read the Arduino data in your serial port of Raspberry Pi, with the step 4 Java compiled code.

You can change the Java code of Step 3 and recompile it, in order to fit your requirements as well.

In the part 5, we will see how to configure the SAP HANA system and SAPUI5 application.

UI5CN

Posted on

SAP HANA Internet of Things (IoT): Raspberry, Arduino Uno, XSJS & SAPUI5


SAP HANA IoT and The Internet of Things

In this entire blog series, we are going to cover one SAP Internet of Things (IoT) application setup, end to end.

Scope and Goals of our HANA IoT Project

SAP HANA IoT has started and is not just one more buzzword.

We have chosen a smart home example which will monitor our place. An example that everyone can relate to.

A photosensor will be monitoring the activity in our place and sending the data to an SAP HANA system, using Arduino and Raspberry Pi, in real-time.

From SAP HANA, you will be using SAPUI5 dashboarding capability to see the LUX  sensor information, in a fancy and simple UI.

Amazing isn’t it?

So prepare for the future and read on.

The main components of this project are:

  1. Lights
  2. Photoelectric sensors
  3. Raspberry Pi
  4. Arduino 
  5. SAP HANA system
  6. SAPUI5 technology


Raspberry Pi arduino for IoT UI5CN

This project, SAP HANA IoT With Arduino Uno, Raspberry Pi, HANA XSJS and SAPUI5, will be detailed in the next blogs:

UI5CN

Posted on

SAP HANA Internet of Things (IoT): Raspberry, Arduino Uno, XSJS & SAPUI5: Part 3


SAP HANA IoT and The Internet of Things

SAP HANA IoT Internet of Things: Raspberry, Arduino Uno, XSJS & SAPUI5

If you have not seen yet, double check the introductionthe first part and the second part of this SAP HANA IoT series.

Today, in this article we are going to perform:

Step 2 – Connect Raspberry Pi to Arduino and able to establish the same configuration which was achieved via computer and Arduino

Since there are many sub-steps, we will cover this step in this part 3 and the the following part 4 of this series.

Here, we are going to do the Raspberry Pi configuration and connecting it to the Arduino Uno.

Raspberry Pi is capable of running a complete operating system and the real advantage is the capability to running with so less power consumption and the easiness to interface with other micro-controller and digital/analog devices .

SAP HANA IoT Internet of Things: Raspberry, Arduino Uno, XSJS & SAPUI5

Why do we use Arduino here ?

Raspberry Pi is a fine little computer board, though not nearly as good as the Arduino when it comes to I/O capabilities.

Since our experiment has a sensor network setup, it will be simpler to interface it with Arduino Uno.

Once we have the Arduino connection setup , then we can connect the Raspberry Pi through serial connection and do wonders with it.

Now, we are going to see how you can setup the connection of Raspberry and Arduino Uno in 10 simple steps:

Step 1: Download the RASPBIAN OS in Raspberry download section.

SAP HANA IoT Internet of Things: Raspberry, Arduino Uno, XSJS & SAPUI5

Step 2: Write the image to the disc (SD card) using Win32 image. Bear in mind that If you copy and paste the disk to image then it will not work.

SAP HANA IoT Internet of Things: Raspberry, Arduino Uno, XSJS & SAPUI5

Step 3.Open the SD card in your computer and add following line to the end of file cmdline.txt. Make sure that you leave a line break at the end, as in Linux it will be assumed to be execution of the command. It will be better to use notepad++ to edit, as sometimes notepad can insert some windows specific characters in the file which will not work in Linux (Raspberry system).

SAP HANA IoT Internet of Things: Raspberry, Arduino Uno, XSJS & SAPUI5

In the above image , the Raspberry IP address is first one and our Ethernet port IP is second one. This will enable to connect Raspberry Pi to the Internet through our computer.

Step 4: Change the IP of your Ethernet port to the IP which you have specified in the config file. In this tutorial, it is 192.168.137.1

SAP HANA IoT Internet of Things: Raspberry, Arduino Uno, XSJS & SAPUI5

Step 5: Install Xming and Putty. Putty will be used to establish a SSH connection to Taspberry Pi and Xming will be used to create a graphical session .Download link of Putty and Xming.

Step 6: Once you have installed them, run Xming server and then open Putty.

.SAP HANA IoT Internet of Things: Raspberry, Arduino Uno, XSJS & SAPUI5

Enter the IP address of the Raspberry Pi you configured in step 3 i.e :192.168.137.10

Also make sure that you have SSH enabled in X11 :

SAP HANA IoT Internet of Things: Raspberry, Arduino Uno, XSJS & SAPUI5

Now press open.

Step 7: It will ask for user name and password: username is pi and password is raspberry

SAP HANA IoT Internet of Things: Raspberry, Arduino Uno, XSJS & SAPUI5

Now you are inside the Raspberry Pi 🙂

To view the graphical interface, you have to type lxsession and if everything is correct you will be able to see the graphical navigation window of Raspberry:

SAP HANA IoT Internet of Things: Raspberry, Arduino Uno, XSJS & SAPUI5

Step 8: After you have closed the graphical session using CTR+ Z, install Arduino to Raspberry, using the bellow commands:

sudo apt-get update

sudo apt-get install Arduino

After the installation, you will get a success message as well.

SAP HANA IoT Internet of Things: Raspberry, Arduino Uno, XSJS & SAPUI5

Step 9: Open the graphical session again using lxsession command and open the Arduino sketch IDE that has been installed:

SAP HANA IoT Internet of Things: Raspberry, Arduino Uno, XSJS & SAPUI5

Step 10: Now we have the Arduno’s sketch installed in the Raspberry Pi OS. This final step is to check if we can see the serial port connection visible (/dev/ttyACM0 in Raspberry OS).

SAP HANA IoT Internet of Things: Raspberry, Arduino Uno, XSJS & SAPUI5

We will use this port for our devices’ communication, in the use cases.

In part 4 we will install Java in order to enable a Java program to communicate with Arduino’s serial port 🙂

Posted on

SAP HANA Internet of Things (IoT): Raspberry, Arduino Uno, XSJS & SAPUI5: Part 2


SAP HANA IoT and The Internet of Things

If you have not seen yet, double check the introduction and the first part of this SAP HANA IoT series.
SAP HANA IoT Internet of Things: Raspberry, Arduino Uno, XSJS & SAPUI5Today, in this article we are going to perform:

Step 1 – Connect our Arduino to a Computer and checking if the analog input is working perfectly

For this experiment we have photo sensors that will detect the light intensity and give the data to a computer by serial port communication.

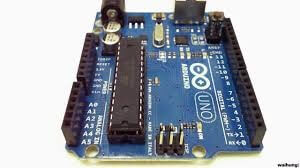
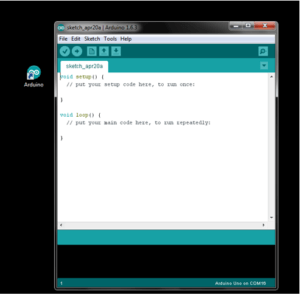
First, install the Arduino Kit from here, to your computer. In our scenario, we will be using Windows.

It looks like this after the installation:


Check also the serial port which is connected to Arduino and set the right port in your installed software:


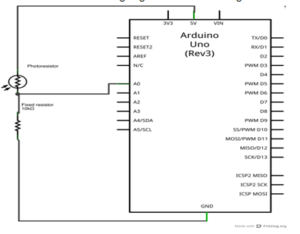
Now, for this demo we are going to follow the circuit diagram below:


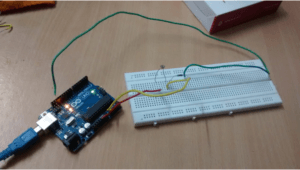
Our circuit looks like this:


Let’s have a look at the code which takes analog input from serial output:


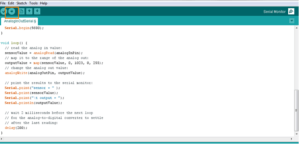
/*

Analog input, analog output, serial output
Reads an analog input pin, maps the result to a range from 0 to 255
and uses the result to set the pulsewidth modulation (PWM) of an output pin.
Also prints the results to the serial monitor.
The circuit:
* potentiometer connected to analog pin 0.
Center pin of the potentiometer goes to the analog pin.
side pins of the potentiometer go to +5V and ground
* LED connected from digital pin 9 to ground
created 29 Dec. 2008
modified 9 Apr 2012
by Tom Igoe
This example code is in the public domain.
*/
// These constants won’t change. They’re used to give names
// to the pins used:
const int analogInPin = A0; // Analog input pin that the potentiometer is attached to
const int analogOutPin = 9; // Analog output pin that the LED is attached to
int sensorValue = 0; // value read from the pot
int outputValue = 0; // value output to the PWM (analog out)
void setup() {
// initialize serial communications at 9600 bps:
Serial.begin(9600);
}
void loop() {
// read the analog in value:
sensorValue = analogRead(analogInPin);
// map it to the range of the analog out:
outputValue = map(sensorValue, 0, 1023, 0, 255);
// change the analog out value:
analogWrite(analogOutPin, outputValue);
// print the results to the serial monitor:
Serial.println(sensorValue);
// wait 5 milliseconds before the next loop
// for the analog-to-digital converter to settle
// after the last reading:
delay(500);
}

Here we are trying to read the analog signal from the photo sensor, via Arduino, and then Arduino will send it via serial port to the computer and use it to show the data sensor reading.

After writing the program you should upload the program to the Arduino Uno.


And now to see the magic happening, open the serial monitor in top right side of the program.


We have demonstrated the result of the step 1 in a short video: SAP HANA IoT with Arduino and Raspberry Pi.

In SAP HANA IoT With Arduino and Raspberry Pi: Part 3, we will be performing step 2.

UI5CN