SAP HANA IoT and The Internet of Things
If you have not seen yet, double check the introduction, first part, second part, third part and fourth part of this SAP HANA IoT series.
We have already covered all the steps related to hardware setup and configuration.
We are going now to focus our attention on SAP HANA and interfacing it with our SAP UI5 frontend.
We are going to cover the SAP HANA setup in this part and SAPUI5 setup in part 6 of the series:
SAP HANA IoT Internet of Things (IoT): Raspberry, Arduino Uno, XSJS & SAPUI5
![]()
Steps which we are going to follow for configuring SAP HANA
Step1: Create the Data Definition for our HANA XS which will be storing the data.
Step2: Create the SQL procedures to do data operations.
Step3: Create the XSJS services to act as a Gateway between the SQL Procedures calls and the service calls for Raspberry Pi and SAPUI5 application.
Step1 – Create the Data Definition for HANA XS
We are going to name it Demo Schema .hdbschema. Note here that demoApp.demo01.app02 is the package path and SHIOT_02 is the project name:
namespace demoApp.demo01.app02.SHIOT_02.Data;

@Schema: 'DemoSchema'

context demo02sensorNetwork {

type sensor_key : String(10);

@Schema: 'DemoSchema'

context demo02sensorNetwork {

type sensor_key : String(10);

@Catalog.tableType : #COLUMN

Entity demo02sensor_info_MD {

key ID: sensor_key;

DESC: String(200);

};

@Catalog.tableType : #COLUMN

Entity demo02sensor_active_TS {

key ID: sensor_key;

key time_stamp: UTCTimestamp;

value : Integer;

};
Once you have activate the code, you need to create two tables demo02sensor_active_TS and demo02sensor_info_MD .
demo02sensor_active_TS: Stores the transactional Data of the sensors (readings with timestamp).
demo02sensor_info_MD: Stores the Master Data of the sensors (Sensor Id’s)
Step2 – Create the SQL procedures to do data operations
We have to create two SQL procedures for data operations: insert_sensor_reading.hdbprocedure and sensor_read.hdbprocedure.
As the names suggest, the first one is going to insert sensor data in sensor table and second one is going to read the recent sensor data from the table.
insert_sensor_reading.hdbprocedure is inside the folder Procedures. It is taking sensor ID and sensor Reading as input:
PROCEDURE
"DemoSchema"."demoApp.demo01.app02.SHIOT_02.Procedures::insert_sensor_reading" (

IN SENSORID NVARCHAR(10),

IN sensor_reading INTEGER )

LANGUAGE SQLSCRIPT AS

BEGIN

/*****************************

Inserting sensor Data

*****************************/

insert into "demoApp.demo01.app02.SHIOT_02.Data::demos02sensorNetwork.demo02sensor_active_TS"

VALUES(:SENSORID, CURRENT_TIMESTAMP , sensor_reading

);

END;
sensor_read.hdbprocedure is inside the folder Procedures. It is taking sensor ID as input and returns one data set of demo02sensor_active_TS.
PROCEDURE
"DemoSchema"."demoApp.demo01.app02.SHIOT_02.Procedures::sensor_read(

IN id NVARCHAR(10),

OUT result "DemoSchema"."demoApp.demo01.app02.SHIOT_02.Data::demo02sensorNetwork.demo02sensor_active_TS")

LANGUAGE SQLSCRIPT

SQL SECURITY INVOKER

--DEFAULT SCHEMA

READS SQL DATA <u>AS</u>

BEGIN

/*****************************

Reading sensors Data

*****************************/

result = select *

from "DemoSchema"."demoApp.demo01.app02.SHIOT_02.Data::demo02sensorNetwork.demo02sensor_active_TS"

where "ID" = :id and "time_stamp" = (select max("time_stamp") from

"DemoSchema"."demoApp.demo01.app02.SHIOT_02.Data::demo02sensorNetwork.demo02sensor_active_TS"

where "ID"= :id);

END;
Step3: Create the XSJS services
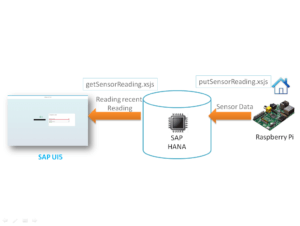
Create the XSJS services to act as a Gateway between the SQL Procedures calls and the service calls for Raspberry Pi and SAP UI5 application:
We have two services.
The first one is getSensorReading.xsjs which reads the recent sensor reading for the sensor id, passed in the URL. It uses sensor_read.hdbprocedure for database call.
var sensorId = $.request.parameters.get("id");

var body = "error";

var data ={

"id":"error",

"timestamp":"error",

"value":0

};

body = sensorId;

if(sensorId === undefined){

$.response.setBody( "Invalid key !!!");

}

else{

$.response.contentType = "text/plain";

$.response.setBody(sensorId);

try {

var conn = $.db.getConnection();

var query = 'call \"demoApp.demo01.app02.SHIOT_02.Procedures::sensor_read\"(?,?)';

var cst = conn.prepareCall(query);

cst.setString(1, sensorId);

var rs = cst.execute();

conn.commit();

rs = cst.getResultSet();

while(rs.next()){

data.id = rs.getNString(1);

data.timestamp= rs.getTimestamp(2) ;

data.value= rs.getInteger(3);

}

body = JSON.stringify(data);

conn.close();

} catch (e) {

body = e.stack + "\nName:"+ e.name+"\nMsg" + e.message;

$.response.status = $.net.http.BAD_REQUEST;

}

}

$.response.contentType = "text/plain";

$.response.setBody(body);
Then after that, we use putSensorReading.xsjs which reads the recent sensor reading for the sensor id and sensor value passed in the URL. It uses insert_sensor_reading.hdbprocedure for database call to store the data.
var sensorId = $.request.parameters.get("id");

var sensorReading = $.request.parameters.get("value");

sensorReading = parseInt(sensorReading,10);

var body = "error";

if(sensorId === undefined){

$.response.setBody( "Invalid key !!!");

}

else{

$.response.contentType = "text/plain";

$.response.setBody(sensorId);

try {

var conn = $.db.getConnection();

var query = 'call \"demoApp.demo01.app02.SHIOT_02.Procedures::insert_sensor_reading\"(?,?)';

var cst = conn.prepareCall(query);

cst.setString(1, sensorId);

cst.setInteger(2, sensorReading);

var rs = cst.execute();

conn.commit();

//as no record returned

if(rs == 0){

body = true;

}

conn.close();

} catch (e) {

body = e.stack + "\nName:"+ e.name+"\nMsg" + e.message;

$.response.status = $.net.http.BAD_REQUEST;

}

}

$.response.contentType = "text/plain";

$.response.setBody(body);
In the real world setup we need also to assign the security key to each sensor and pass it to verify the readings.
Also it would be better to have the timestamp taken from the sensor source and store it in the database but for keeping the coding and complexity minimum we are focusing on the core steps.
In part 6, we are going to setup the SAPUI5 App and integrate it with the backend.
UI5CN