1.Why?
The purpose of getting an S/4 HANA® On-Premise system is to learn and practice some of the new and upcoming technologies of SAP® Hands-on. Having access to a personal sandbox system allows you to learn multiple technologies at once with freedom. With S/4 HANA® On-Premise Systems you can learn not only S/4 HANA® Technical but also ABAP®, ABAP® RAP, CDS, Fiori®, UI5, Basis, BTP(SAP® Cloud Platform), HANA® DB and Many more such topics.
Also,check UI5CN courses to learn SAPUI5, SAP® Fiori®, SAP® CDS, S/4 HANA, ABAP®, ABAP® RAP, SAP® BTP Hands-on with Details
https://www.ui5cn.com/collections
Get All Course Access with Pricing Plan
https://www.ui5cn.com/pages/pricing
2. What?
In this course, you will see how to use the image of S/4 HANA® 1909 On-Premise in Docker Hub(provided by SAP®) and install it on your personal computer or Cloud VM. We have kept all the steps very simple to understand and also shared our experience, so the installation would be a piece of cake for you.
3. Prerequisite and Architecture
![]()
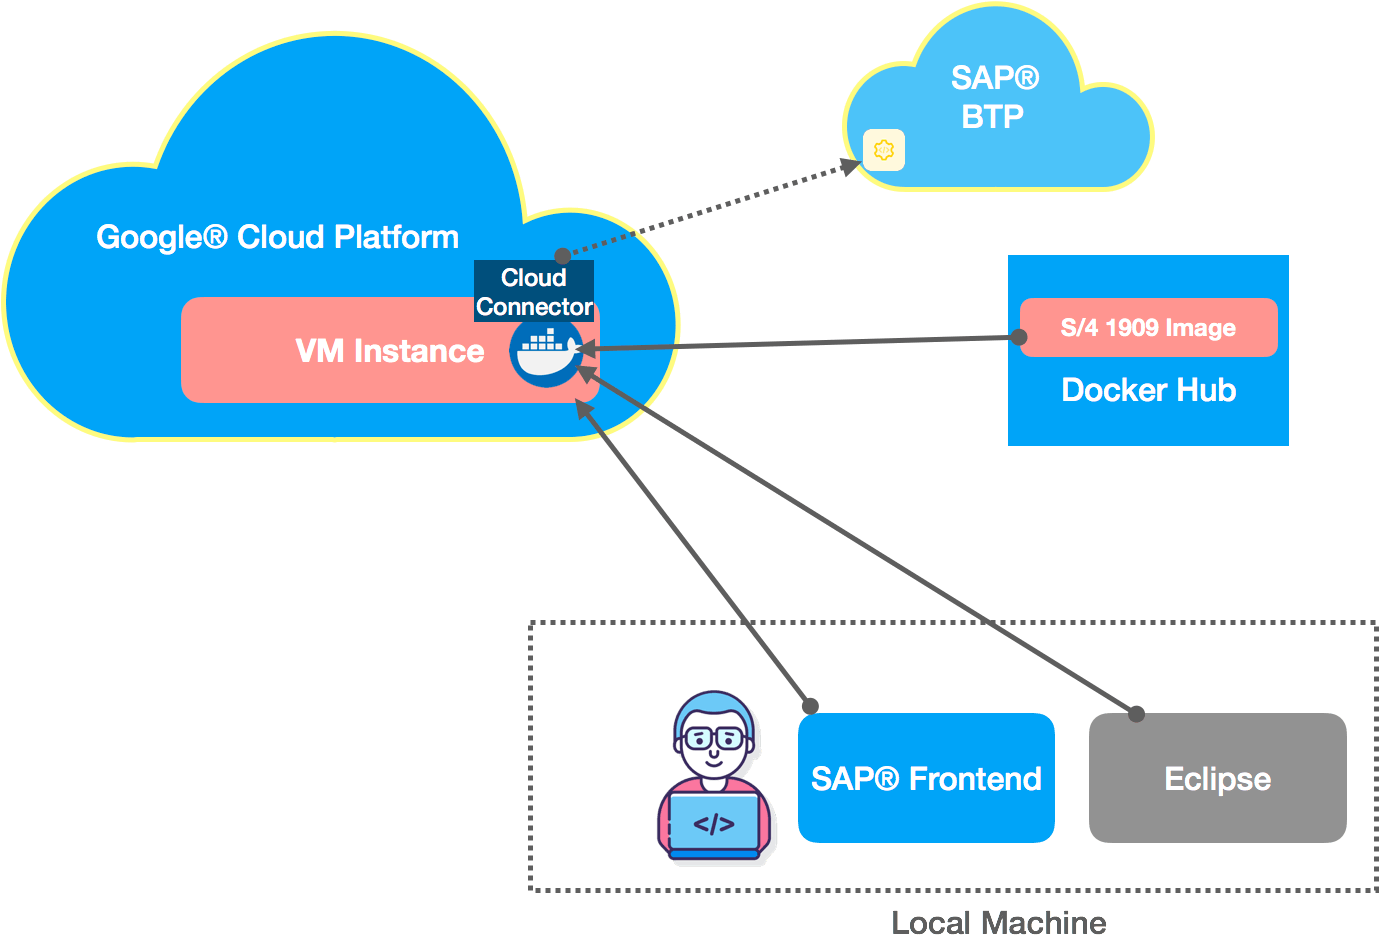
We will be Using Google® Cloud Platform(GCP) to create our VM Instance which will be having our S/4 HANA® On-Premise Instance running in Docker Engine.
The S/4 HANA® Docker Engine will be acquired from Docker Hub where SAP® is providing the S/4 1909 system Docker images(based on updates the new version can change). You as a developer can access the Systems from local SAP® Frontend GUI or Eclipse with ABAP® ADT plugins.
Prerequisite:
- Account in Google® Cloud Platform(GCP) with Credit Card Added
- Compute Engine API Enabled for GCP
- SAP® Frontend Installed in Local Machine
- Eclipse Installed in Local Machine with ABAP® ADT Plugins
- Basic knowledge of installation with Linux(Ubuntu) Systems
- Docker Hub Account
4. Create a VM Instance in GCP
Create a Linux(Ubuntu 18.04) based VM Instance in GCP with minimum specification as below
– 8 CPUs
– 32GB RAM
– 190GB Disk
Note: You can use other Operating Systems as well, but the Minimum specifications need to be as below for different OS types:
For Windows OS Machine:
– 4 CPUs for Docker Desktop
-16GB RAM for Docker Desktop
-170GB Disk for Docker Desktop
For Linux OS:
– 4 CPUs
– 16GB RAM
– 150GB Disk
For macOS:
– 4 CPUs for Docker Desktop
– 16GB RAM for Docker Desktop
– 170GB Disk for Docker Desktop
If you are installing the machine on a Personal Computer then you need to allocate the above resources to Docker Engine. As these specifications are higher than many of our personal computer specifications so we are using a VM instance in Cloud to install the machine.
In case you provide fewer system resources than the minimum requirement, then you will face issues while the installation of S/4 HANA® will go into a state where it will go out of memory and installation can fail or take too long.
5. Install Docker
Install Docker on Ubuntu Machine with the below commands:
sudo apt update sudo apt install apt-transport-https ca-certificates curl software-properties-common curl -fsSL https://download.docker.com/linux/ubuntu/gpg | sudo apt-key add - sudo add-apt-repository "deb [arch=amd64] https://download.docker.com/linux/ubuntu bionic stable" sudo apt update apt-cache policy docker-ce sudo apt install docker-ce sudo systemctl status docker |
6. Download and Install S/4 HANA®
6.1 Login to Docker Hub Using CLI
sudo docker login <Your Docker Hub UserID> <Your Docker Hub PASS> |
6.2 Pull the S/4 HANA® Image from Docker Hub, Start Installation and Run the Container
sudo docker run --stop-timeout 3600 -i --name a4h -h vhcala4hci -p 3200:3200 -p 3300:3300 -p 8443:8443 -p 30213:30213 -p 50000:50000 -p 50001:50001 store/saplabs/abaptrial:1909 -skip-limits-check -agree-to-sap-license |
Here we are exposing ports:For Frontend GUI: 3200
For Eclipse: 30213
For Cloud Connector: 8443
For oData Access HTTP: 50000
For oData Access HTTPS: 50001
For RFC: 3300
The flag -agree-to-sap-license is an optional flag, if you do not apply it then it will ask to accept the license after installation.
The Installation will first download the Docker image, then extract it and then Install it. It might take up to 1-2 hrs depending on your network speed and system configuration. As the Docker image is 23GB in size when compressed and 63GB when unzipped.
Note: For our setup below are time take to perform actions:
- The download of 23GB Docker Image – Approx 15 min
- Extraction of 23GB Docker Image to 63GB Image – Appx 20 min
- Installation of S/4 HANA® when we run Docker Image for the first time – Approx 25 min
Total time taken: 1 hr(Approx)
The Initial screen at the start of Installation is below:
![]()
The Final Screen After Installation is below:
![]()
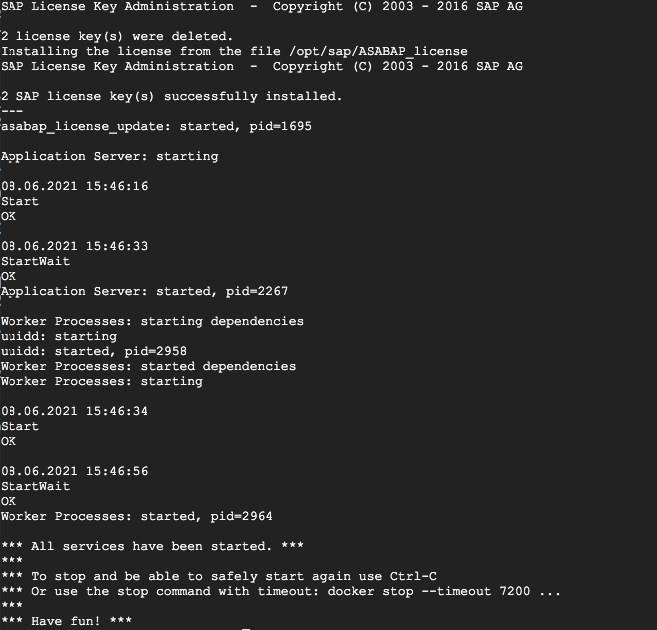
Congratulations! if you see this message, your System is now ready to be used. Also, if you want to learn Hands-on new SAP® Skills of Front-end or Backend you can check our course information here: https://www.ui5cn.com/collections
7. Monitor During/After Installation and Start/Stop System
At the time of System installation, you can monitor the progress and memory status to make sure the installation is not halted with the below commands.
7.1 Memory used for container a4h
sudo docker exec -it a4h free -h |
![]()

7.2 Disk Space allocated for container a4h
sudo docker exec -it a4h df -h / |
![]()

![]()
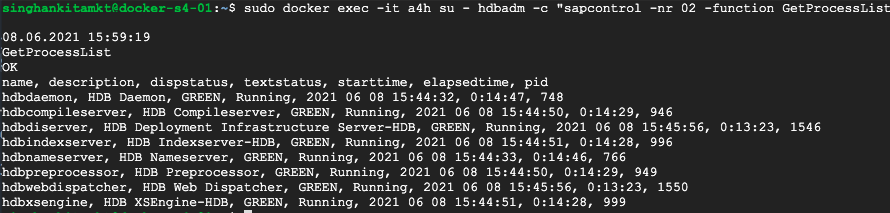
7.3 For checking HDB Components Status
sudo docker exec -it a4h su - hdbadm -c "sapcontrol -nr 02 -function GetProcessList" |
![]()
7.4 Installation in Personal Computer
Note: If you are performing the steps on your own personal computer then instead of using the IP of VM use the IP of Docker which you can find with the below command:
sudo docker inspect --format '{{ .NetworkSettings.IPAddress }}' a4h |
7.5 Start, Stop and Logs of Docker Machine
Once the installation is done and you want to stop the machine then use
sudo docker stop a4h |
For starting the machine again use
sudo docker start a4h |
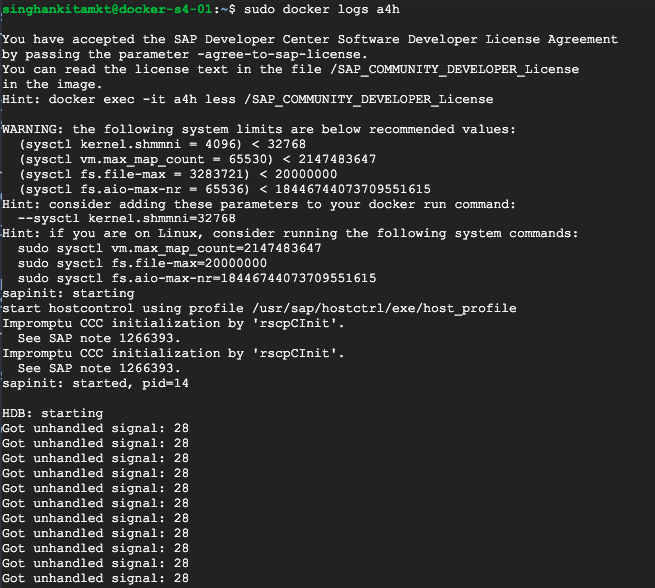
For checking logs or the status of the running machine use
sudo docker logs a4h |
8. Adding Licence
Go to acquire a mini SAP® Developer License here.
Select the A4H System and provide your Hardware Key to generate the License.
Hardware Key is printed in Console at the time of Installation of S/4 HANA®.
In case you are not able to find the Hardware key in the installation Console then you can go to Early Watch to get the hardware key
Early Watch SAP® Login Details:
Client: 000
User: SAP*
Password: Ldtf5432
Note: Ldtf5432 is the default master password for your system.
Go to T-Code: SLICENSE
The other way is to also download your License and upload it to GCP Linux Machine. Then you can use the below command to apply the license to Docker Image:
sudo docker cp <Path_to_License_File_in_VM_A4H.txt> a4h:/opt/sap/ASABAP_license sudo docker exec -it a4h /usr/local/bin/asabap_license_update |
Optional: Stop and Start the Docker engine again for a new License to work properly.
9. Connecting to SAP® Frontend and Eclipse
You must have a Firewall rule added to your VM Instances which will allow ports that you want to access from outside, which can be for SAP® GUI, Eclipse, or SAP® Cloud Connector, etc.
The list of Port to be opened are:
For Frontend GUI : 3200
For Eclipse : 30213
For Cloud Connector: 8443
For oData Access HTTP: 50000
For oData Access HTTPS: 50001
For RFC: 3300
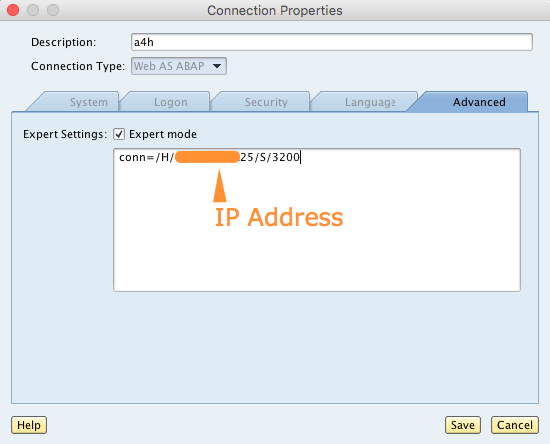
For SAP® Frontend Machine you can use the below setting:
conn=/H/<IP ADDRESS OR HOST OF VM>/S/3200
Or
Server: <VM IP Address>
Instance: 00
System ID: A4H
![]()
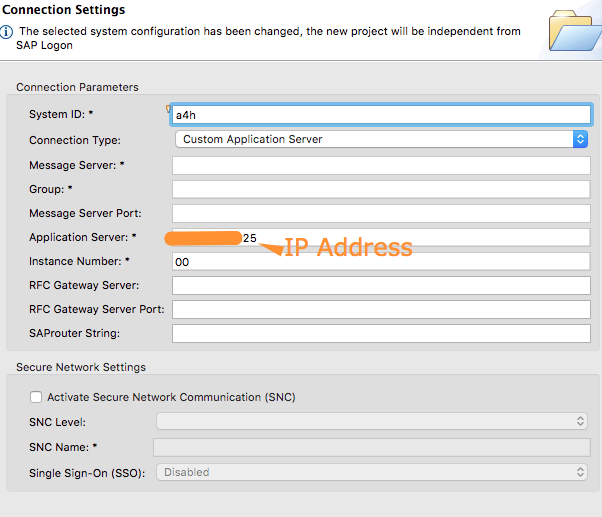
For Eclipse You can Use
![]()
Default Username and Password:
SAPGUI
Client: 001
User: DEVELOPER
Password: Ldtf5432
SAP DB SYSTEMDB
User: SYSTEM
Password: Ldtf5432
For the database HDB,
User: SAPA4H,
Password: Ldtf5432
10. SAP® Cloud Connector
For Starting Cloud Connector in Docker VM:
sudo docker exec -it a4h bash # Inside the Docker a4h bash shell use below command to start Cloud Connector /usr/local/sbin/rcscc_daemon start |
For Stopping Cloud Connector:
# Inside the Docker a4h bash use below command to stop Cloud Connector /usr/local/sbin/rcscc_daemon stop exit |
You can Access Cloud Connector With Below Details:
URL: https://<IP Address of VM>:8443
Username: Administrator
Password: manage
Note: Do not forget the s of HTTPS in the URL and click proceed even if it shows the warning in the initial screen. Also, the default username and password are case-sensitive.