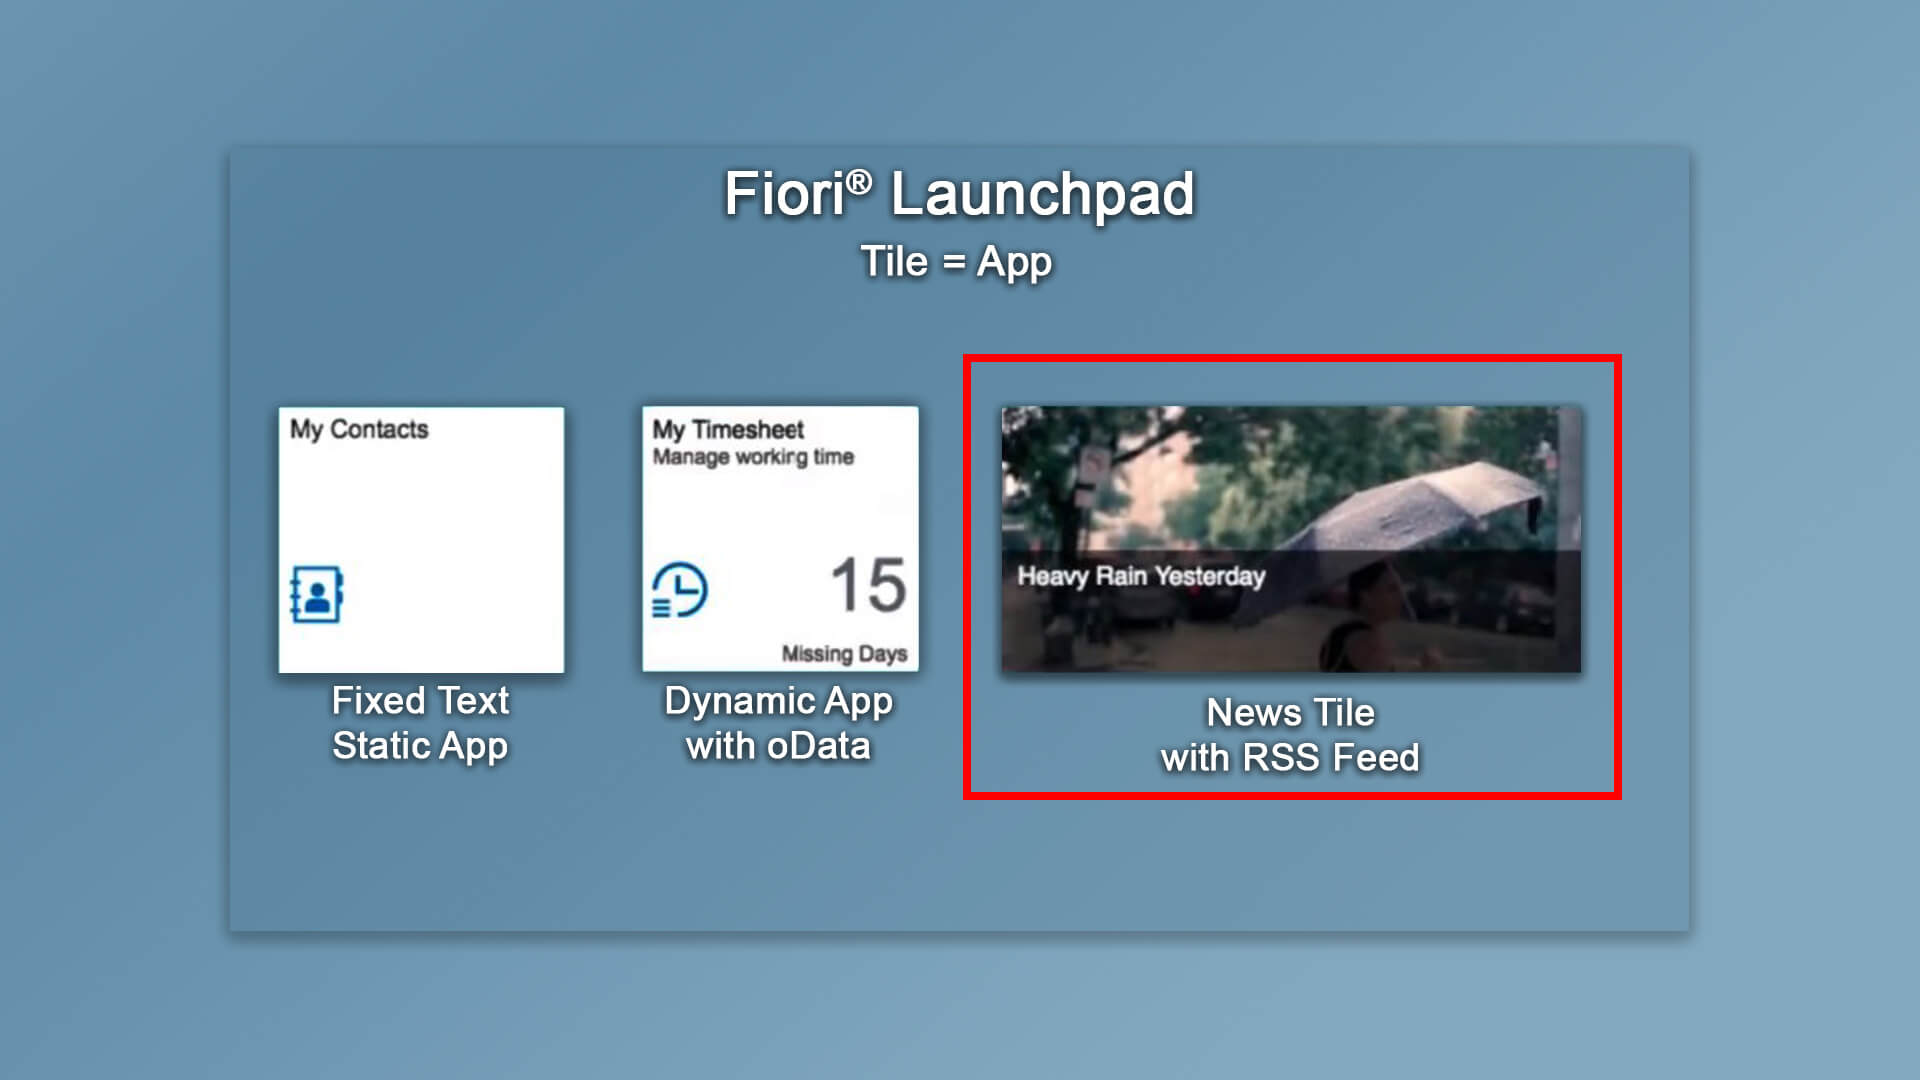
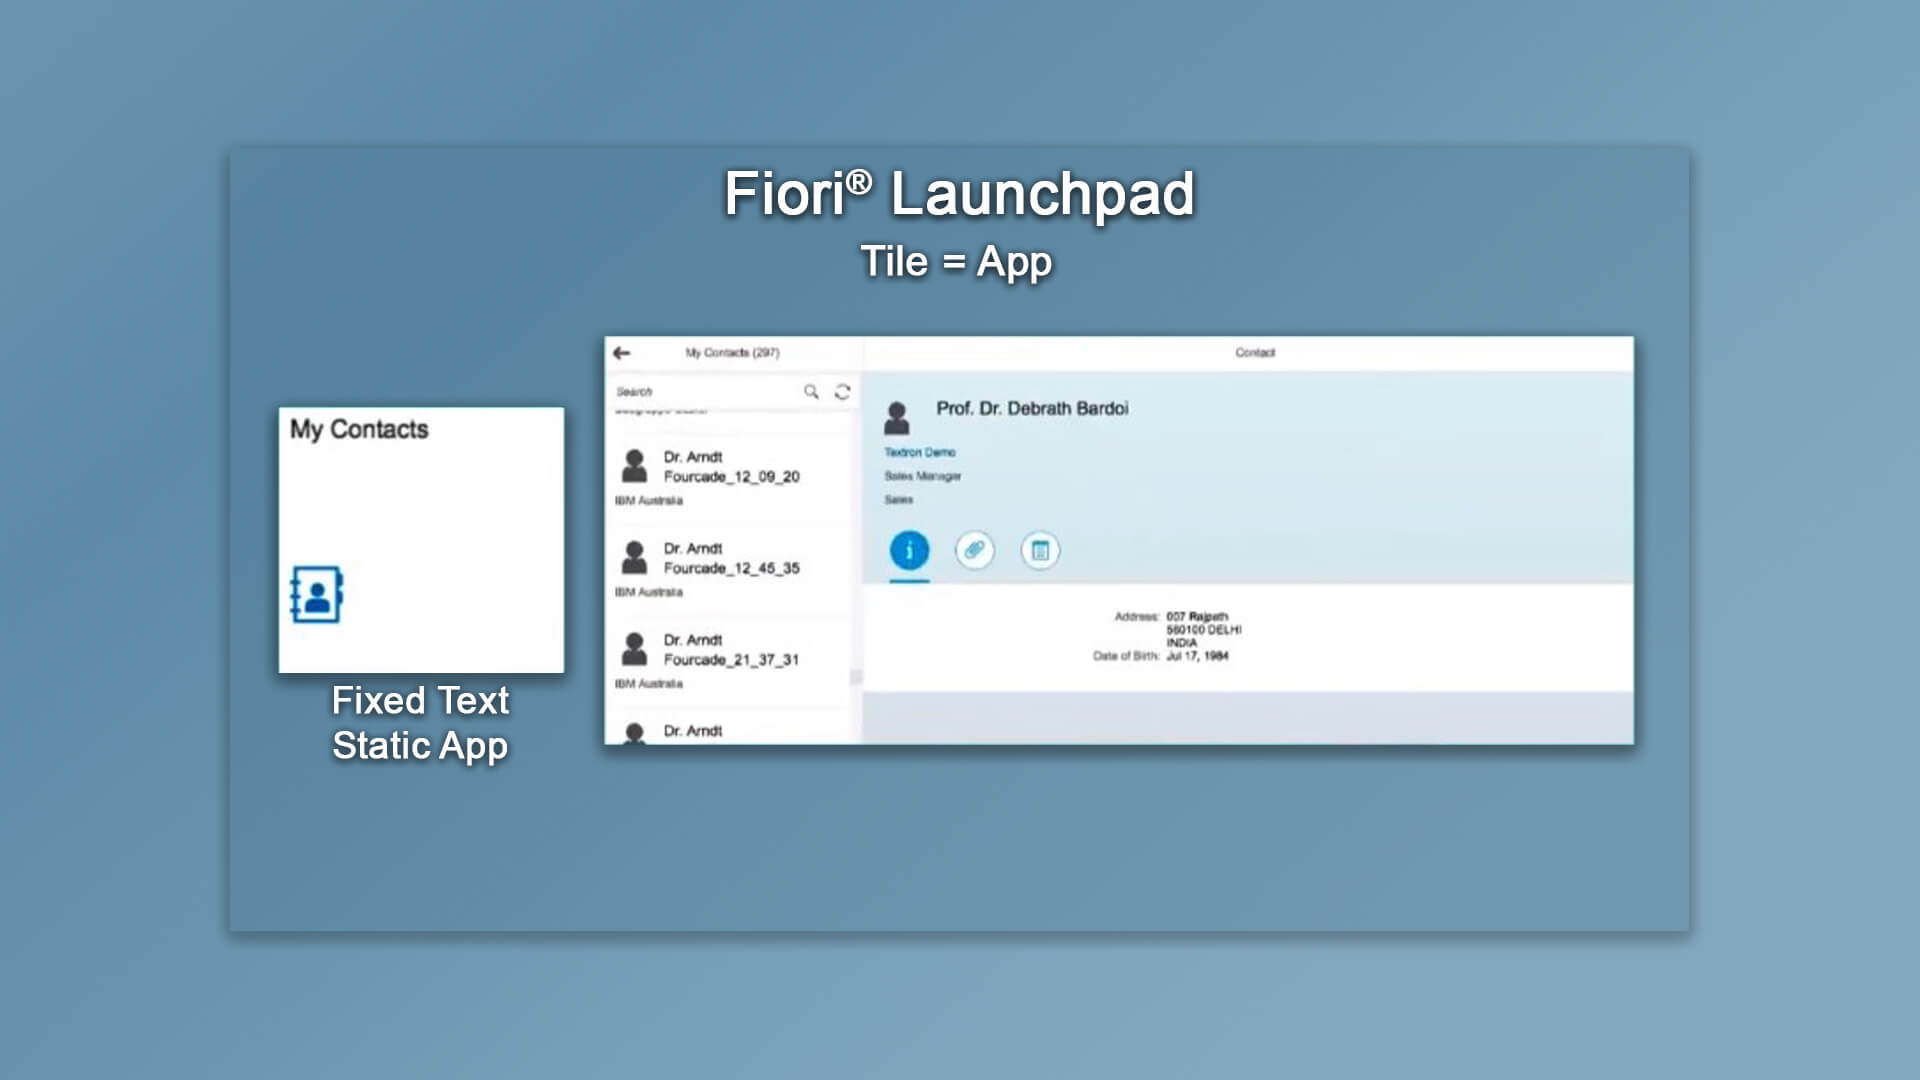
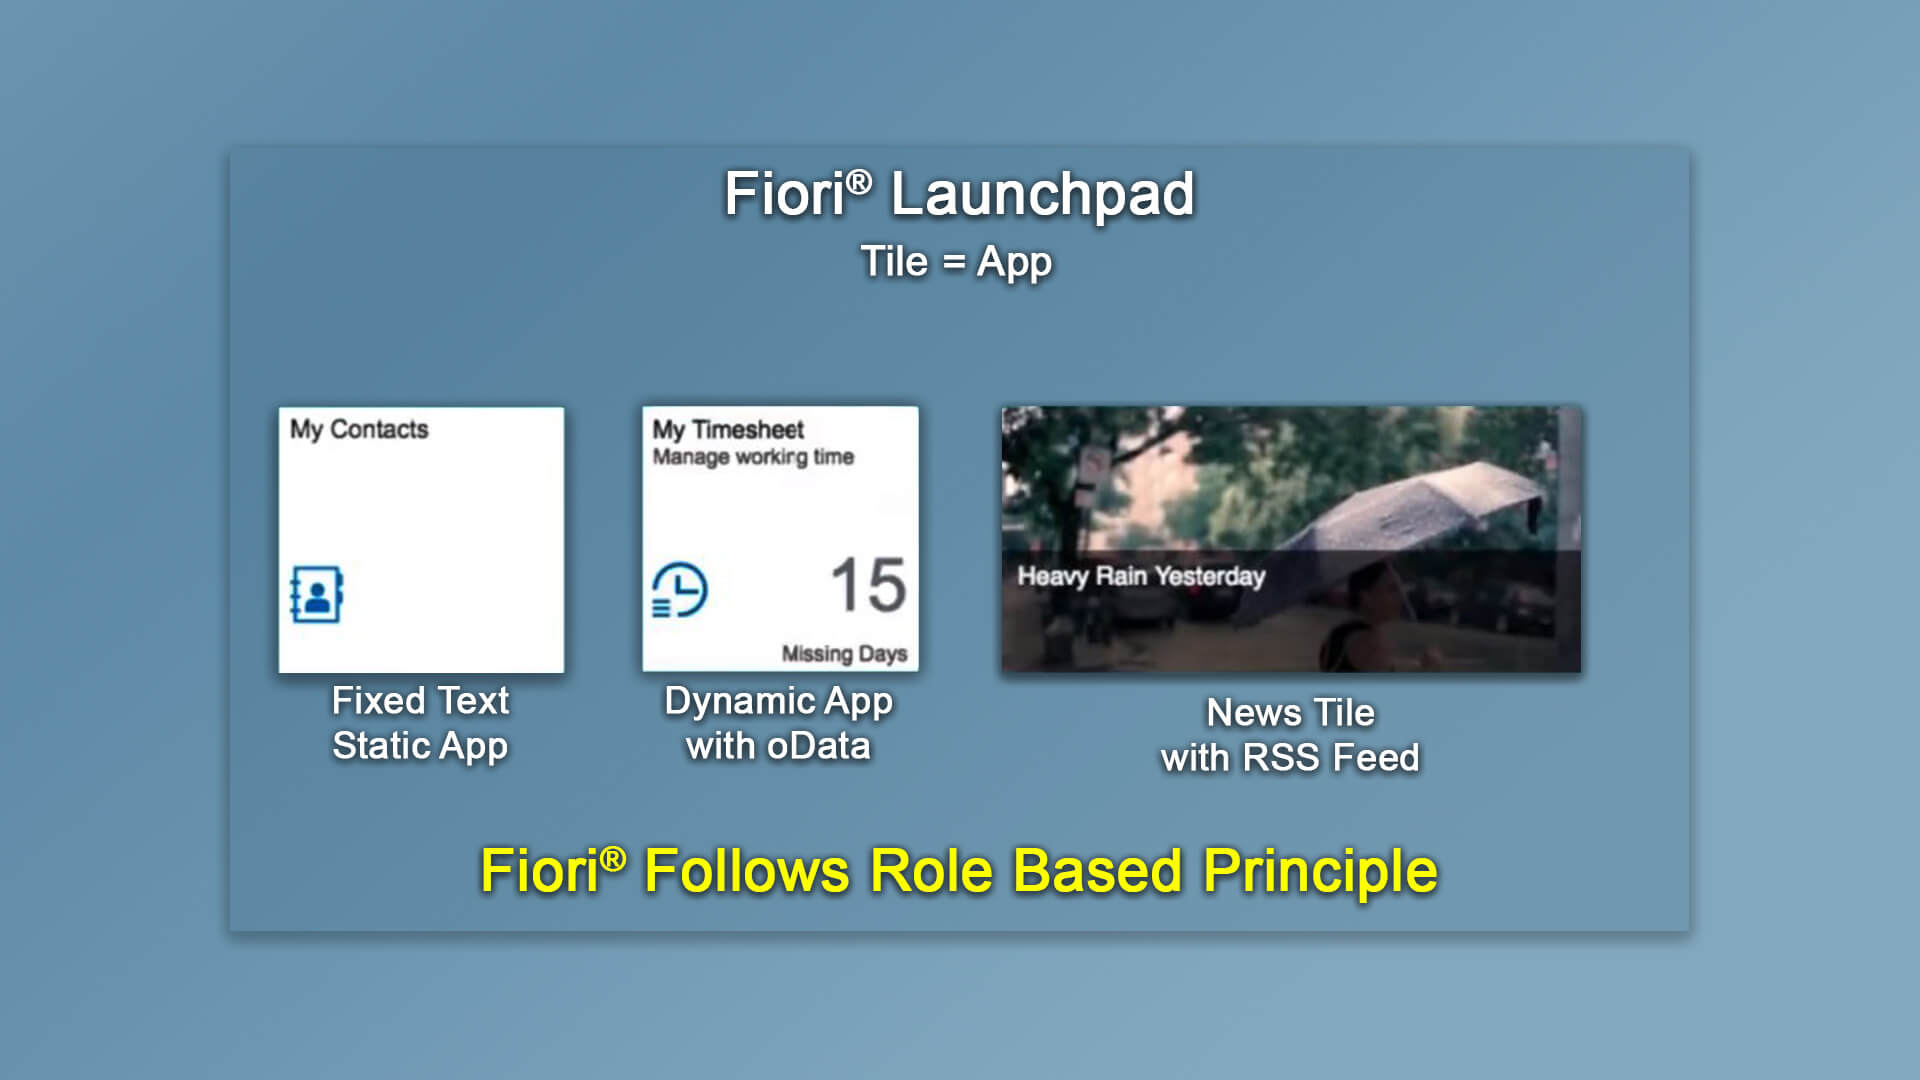
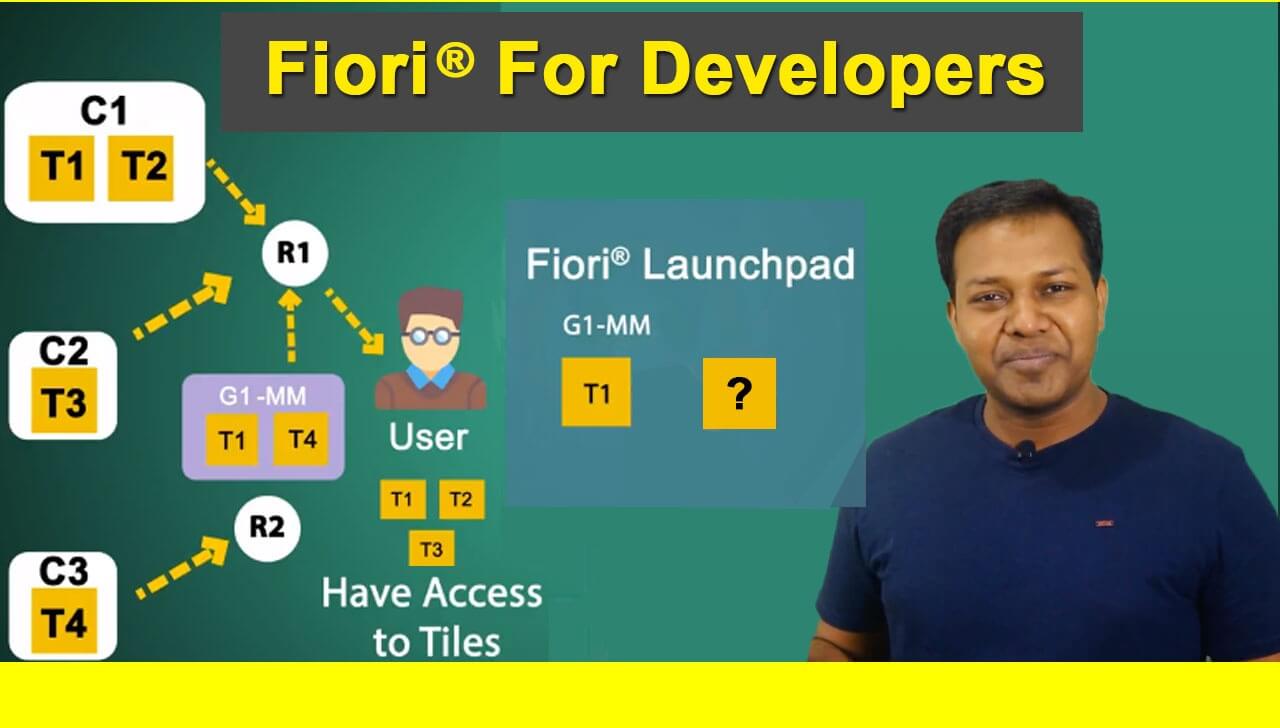
Posted on

#2 Installation of SAPĀ® CAPM – 7 Steps to Get Started With SAPĀ® CAPM

Before we begin!

In this 7 blog series, we are going to provide a small end-to-end scenario to work with SAP® CAPM. Here the usecase we are going to use is of Learning Management System(LMS) and build a Student List App and Deploy it to SCF.

Link to Master(or Main) Blog from which all the other blogs can be reached is Here.

  • If you wanted to check out the detailed course on SAP® CAPM the link is Here.
  • If you want to get learn SAP® Cloud Platform Development in Detailed then we have a 35hrs hands-on course Here.
  • For current offers and discounts check offer page Here.

In this section we are going to install SAP® CAPM library in our local computer


Prerequisite:

You need to have NodeJS installed(official NodeJS site here and all versions for download from here) in your machine(v10.5 is what we have used).

Also, NPM(Node Package Manager) would automatically get installed with NodeJS.


Step 1: Set NPM registry of SAP®

NPM registry points to a place where libraries are present. When NPM installs a package, then it looks to that place to find the library.

Example: Suppose, you have a registry at www.mycoolrepo.com where you are having your xyz library(or module).
When you use npm install xyz it should search your www.mycoolrepo.com for the xyz module, then download that to the current project where you are working.

In the case of CAPM and related development, we are going to use https://npm.sap.com NPM registry to install required Node Modules. Use below command to set this:

    npm set @sap:registry=https://npm.sap.com

Step 2: Confirm installation

We will list all the NPM repository present in our computer

 npm config list

On successful Installation we will see npm.sap.com as registry:

Output

Step 3: Install @sap/cds

@sap/cds will provide us cds command access in terminal/command prompt.
Using cds we will be able to:

  • Create
  • Run
  • Build

CAPM Code Locally.

We can -g flag with the command to install @sap/cds-dk globally, use command below to install the cds-dk library globally:

    npm install -g @sap/cds-dk

Step 4: Confirm installation

To confirm installation of @sap/cds use command

  cds

You will get the output as shown below

USAGE
    cds <command> [<args>]
    cds <src>  =  cds compile <src>
    cds        =  cds help
COMMANDS
    i | init       jump-start cds-based projects
    c | compile    process models selectively
    m | import     add models from external sources
    s | serve      run servers locally
    r | repl       read-eval-event loop
    e | env        get/set cds configuration
    b | build      prepare for deployment
    d | deploy     e.g. to databases or cloud
    v | version    get detailed version information
    ? | help       get detailed usage information
    Learn more about each with:
    cds help <command> or
    cds <command> ?

Step 5: Search modules inside registry

You can search inside https://npm.sap.com registry to see all
packages it contains with command:

 npm search --registry https://npm.sap.com sap

Output:

    NAME                      | DESCRIPTION          | AUTHOR          | DATE       | VERSION  | KEYWORDS
@sap/approuter            | Node.js based…       |                 | 2019-11-12 | 6.6.0    |         
@sap/site-entry           | SAP Portal…          | =Portal Team    | 2019-08-07 | 1.30.0   | 
@sap/grunt-sapui5-bestpra | Grunt tasks around…  |                 | 2019-10-03 | 1.4.2    | 
ctice-build               |                      |                 |            |          | 
@sap/xsjs                 | Compatibility layer… |                 | 2019-11-20 | 5.3.0    | 
@sap/xssec                | XS Advanced…         |                 | 2019-09-02 | 2.2.3    | xs
@sap/cds                  | Entry Point and API… |                 | 2019-11-18 | 3.18.4   | 
@sap/node-jwt             | JWT validation…      |                 | 2019-09-27 | 1.6.5    | jwt security sap xs
@sap/xsodata              | Expose data from a…  |                 | 2019-10-28 | 4.7.0    | odata xsjs
@sap/hdbext               | Hana-client…         |                 | 2019-11-20 | 6.1.1    | HDB hana sap sql hdi
@sap/portal-cf-content-de | SAP portal site…     | =Portal Team    | 2019-11-20 | 3.24.0-… | portal content-deployer
ployer                    |                      |                 |            |          |                        
@sap/cloud-sdk-core       | SAP Cloud SDK for…   |                 | 2019-11-21 | 1.13.1   | 
@sap/cloud-sdk-test-util  | SAP Cloud SDK for…   |                 | 2019-11-21 | 1.13.1   | 
@sap/cloud-sdk-vdm-accoun | SAP Cloud SDK for…   |                 | 2019-11-21 | 1.13.1   | 
ting-document-service     |                      |                 |            |          | 
@sap/cloud-sdk-vdm-attach | SAP Cloud SDK for…   |                 | 2019-11-21 | 1.13.1   | 
ment-service              |                      |                 |            |          | 
@sap/cloud-sdk-vdm-bank-d | SAP Cloud SDK for…   |                 | 2019-11-21 | 1.13.1   | 
etail-service             |                      |                 |            |          | 
@sap/cloud-sdk-vdm-batch- | SAP Cloud SDK for…   |                 | 2019-11-21 | 1.13.1   | 
service                   |                      |                 |            |          | 
@sap/cloud-sdk-vdm-bill-o | SAP Cloud SDK for…   |                 | 2019-11-21 | 1.13.1   | 
f-material-comparison-ser |                      |                 |            |          | 
vice                      |                      |                 |            |          | 
@sap/cloud-sdk-vdm-bill-o | SAP Cloud SDK for…   |                 | 2019-11-21 | 1.13.1   | 
f-material-service        |                      |                 |            |          | 
@sap/cloud-sdk-vdm-bill-o | SAP Cloud SDK for…   |                 | 2019-11-21 | 1.13.1   | 
f-material-v2-service     |                      |                 |            |          | 
@sap/cloud-sdk-vdm-bill-o | SAP Cloud SDK for…   |                 | 2019-11-21 | 1.13.1   | 
f-material-where-used-ser |                      |                 |            |          | 
vice                      |                      |                 |            |          |

Before we end!

In this 7 blog series, we are going to provide a small end-to-end scenario to work with SAP® CAPM. Here the usecase we are going to use is of Learning Management System(LMS).

Link to Master(or Main) Blog from which all the other blogs can be reached is Here.

  • If you wanted to check out the detailed course on SAP® CAPM the link is Here.
  • If you want to get learn SAP® Cloud Platform Development in Detailed then we have a 35hrs hands-on course Here.
  • For current offers and discounts check offer page Here.
Posted on

#1 Introduction – 7 Steps to Get Started With SAPĀ® CAPM

Before we begin!

In this 7 blog series, we are going to provide a small end-to-end scenario to work with SAP® CAPM. Here the usecase we are going to use is of Learning Management System(LMS) and build a Student List App and Deploy it to SCF.

Link to Master(or Main) Blog from which all the other blogs can be reached is Here.

  • If you wanted to check out the detailed course on SAP® CAPM the link is Here.
  • If you want to get learn SAP® Cloud Platform Development in Detailed then we have a 35hrs hands-on course Here.
  • For current offers and discounts check offer page Here.

Now let’s start this series with a little background about SAP® CAPM

Table of Content

#1. Why and What
#2. Developer Stack
#3. Links to Blogs of this Series


#1: Why and What

SAP® Cloud Application Programming Model(CAPM) is a set of Library, Tools, Language and Framework from SAP® for building Apps.

The main reason for creating CAPM is to

  • Provide a Simple way to Create Cloud-Based Apps
  • The Apps and code which developer created can be made more reusable as modules
  • Advantage of Microservice can be utilized
  • Apps in Cloud can be easily integrated with Cloud Services(like DB service, message broker service or Auth Provider service)
  • A developer can focus more on the functional side of problem-solving

The 2 main Principle of SAP® CAPM are:

  • Declarative Approach: Focus on Outcome, not on Way!
  • Service-Based Approach: Get the Functionality from Service

Declarative Approach

So, if you are a developer you need to focus more on understanding the functional side which is what customer needs now, and also thinking about how can the App/Platform you are developing will evolve over time. Keeping this in mind you need to keep your current development modular, so it can allow future changes easily or your current development can be reused in the future easily.

Service-Based Approach

In CAPM all functionalities need to be broken down as service(s). In CAPM Services are stateless which means there is no record of previous interactions and each interaction request has to be handled based entirely on information that comes with it. You will also see, that to implement new service/functionality we will many times query existing service(s).


#2: Developer Stack

That Sounds Great! But you might be having questions like How it is Build and How as a developer you will work with it?


  • CAPM Lib are Predominantly Build With NodeJS, so you need to have basic know-how of NodeJS
  • We will use a lot of CDS code, may it be for building data structure(entity model/Table Structure), creating services(with functions) or even creating UI(with CDS Annotations)
  • You will find many out of the box tools which are part of CAPM, for example for running Apps with Fiori® Preview just with developed service, for building data structure to deploy in Database like HANA®, Sqlite or Other Other and many more surprises!


Prerequisite and Getting Started

We will create a simple End-to-End CAPM App using HDI Container in SAP® Cloud Foundry from Scratch.

Regarding Prerequisites:

  • Basic knowledge of NodeJS is required
  • Basic knowledge of SAPUI5 is required
  • Basic knowledge of CDS is required

#3: Links to Blogs of this Series

  • Introduction – this blog
  • Installation – here
  • Hello World Service – here
  • Creating Schema and Database – here
  • Create UI Annotations – here
  • Create UI5 App – here
  • Deploy App to SCF – here

Before we end!

Link to Master(or Main) Blog from which all the other blogs can be reached is Here.


  • If you wanted to check out the detailed course on SAP® CAPM the link is Here.
  • If you want to get learn SAP® Cloud Platform Development in Detailed then we have a 35hrs hands-on course Here.
  • For current offers and discounts check the offer page Here.


Also, You can Watch the Entire Blog Series in the below video:


Thanks for Your Time!

Posted on

Understanding SAPĀ® FioriĀ® Launchpad and Tiles Types


Link to Full Course:
https://www.ui5cn.com/courses/fiori-for-developers


  • SAP® Fiori® Launchpad, is the starting point for our developers and users.
  • We will have multiple applications in the Launchpad (which are assigned to us by roles) and Launchpad is also often referred to as the homepage.
  • Each Tile in Fiori® Launchpad® represents one Application.


  • The first type of Tiles with Static Text and Icon/Image is Static Tiles, for Example, My Contact Application


  • The second type of tile or application we can have is the Dynamic Tile which can contain dynamic changing numeric values (representing some form of KPI). For example Timesheet Application, we can go inside this Tile(application) and we can fill our Timecard which then needs to be approved by our manager(s).
  • The KPI it contains also shows from how many days we have last filled out timecard(Missing Days which changes dynamically).


  • And the third type of application/tile we have is Newsfeed Application Tile. The news feed application tile would be utilizing the RSS Feed and represent news in terms of tiles.


  • If we go into My Contact Tile then we can see a Split Application(as shown below). In split-screen Application, the screen is divided into a Master and a Detail Page. This is one type of application similar to that we can have list report application, analytical dashboard application, and many more different types.


Now, how an Application or Tiles are given to a particular user?

  • This is possible with Roles and Authorization. Also, Fiori® follows the Role-Based Principle.
  • If you want to provide a specific application to a user then you just provide them with Roles which is required for that application.
  • Also, we might have multiple types of roles link to an application, for example, in Timecard we can have manager roles to approve a timesheet, user roles to fill and submit a timecard, etc.
  • We will discuss in detail these Authorization concepts in our Fiori® for Developers Course as well(later on).


For a particular user to see Tiles(or Application) in Launchpad we need to configure 3 Main things:

  • Roles
  • Catalogs
  • Groups

We will see in details how to perform those in Fiori® for Developers Course here:
https://www.ui5cn.com/courses/fiori-for-developers

SAP® Fiori® Blog Series Links :

  1. SAP® Fiori® Launchpad Configuration – Starting with Catalog Creation
  2. SAP® Fiori® – Understanding Fiori® Launchpad (Current Blog)
  3. SAP® Fiori® – Understanding Fiori® Catalogs, Tiles, Roles and Groups (Blog Coming Soon)
  4. Fiori® Applications Types and Architecture (Blog Coming Soon)
  5. Types of Fiori® Apps – Transactional Fiori® Application Overview and Architecture (Blog Coming Soon)
  6. Fact Sheet Fiori® App Architecture | Fact Sheet Applications | Types of Fiori® Application (Blog Coming Soon)
  7. Analytical & KPI Fiori® App Architecture | Analytical Fiori Application | Types of Fiori Application (Blog Coming Soon)
  8. SAP® Fiori® Architecture and Component | SAP® Fiori® Components | Fiori® Architecture (Blog Coming Soon)


Posted on

FioriĀ® For Developers Online Course – Introduction Page


Introduction to the Course

Learn and Understand Fiori® Apps Debugging, Development, Deployment and Architecture with Hands-on Exercises. SAP® Fiori® for Developers is an unique course that takes you from the basics to intermediate to advance in a step by step manner. We will understand and deep dive more into the details which we have covered in this course such as:

  • Fiori® Launchpad – How Fiori® Launchpad shows you Role-Based Tiles – Different types of Fiori® Apps
  • The Architecture of Fiori® Apps
  • The Architecture of Fiori® Apps and UI Components
  • Understanding Back-end and Front-end services and components
  • How to Deploy and Configure Fiori® Apps
  • How to Extend Screen Elements, UI, Controllers, and Services in Fiori® Apps with Web IDE
  • And a lot of Debugging to make you Comfortable with Production Scenarios.


Link to Full Course:
https://www.ui5cn.com/courses/fiori-for-developers


SAP® Fiori® Blog Series Links :

  1. SAP® Fiori® Launchpad Configuration – Starting with Catalog Creation
  2. Understanding SAP® Fiori® Launchpad and Tiles Types
  3. SAP® Fiori® – Understanding Fiori® Catalogs, Tiles, Roles and Groups (Blog Comming Soon)
  4. SAP® Fiori® Applications Types and Architecture (Blog Comming Soon)
  5. Types of Fiori® Apps – Transactional Fiori® Application Overview and Architecture (Blog Comming Soon)
  6. Fact Sheet Fiori® App Architecture | Fact Sheet Applications | Types of Fiori® Application (Blog Comming Soon)
  7. Analytical & KPI Fiori® App Architecture | Analytical Fiori Application | Types of Fiori Application (Blog Comming Soon)
  8. SAP® Fiori® Architecture and Component | SAP® Fiori® Components | Fiori® Architecture (Blog Comming Soon)


Refer the Blow Video to Understand More,


Posted on

SAPĀ® FioriĀ® Launchpad Configuration – Starting with Catalog Creation


Link to Full Course:
https://www.ui5cn.com/courses/fiori-for-developers


  • Step 1 – Login to our system with the newly created user which is DEVELOPER3 and it will ask to change our previous password.


  • Step 2 – Give a new password and there are some pre-checks for the password, some of which include that the password should not be the same as the previous password and it should be having 8 characters. 
  • Step 3 – Using T-Code SU01 we can see login information of the user as well, we can click on information Icon to check the rules and regulations about the password as well.


  • Step 4 – Now we are in a new User Login and then we have to go into the Fiori® Launchpad using the URL. Now to find the URL for Fiori® Launchpad, go to the Start-up and then using /n go into the Home Screen.


  • Step 5 – We will see the Fiori® Launchpad and right-click on /UI2/FLP – SAP Fiori® Launchpad and Execute in New Window


  • Step 6 – It opens in Internet Explorer then copy the Fiori® Launchpad URL then go to Chrome (Browser Choice for Development) and open a new incognito window, it would ask for credentials of this new user which is DEVELOPER3.


  • Step 7 – Now we get a blank screen because we have not added any application to our Launchpad of DEVEOPER3. So our objective is to provide this user with our Purchase Order App access.
    Now we will log in with Admin User in Fiori® Launchpad to configuration Approve Purchase Order App which we are basically going to provide access to the App to DEVELOPER3.


  • Step 8 – Go to Launchpad Configurator(With Admin User). To get the Launchpad Configurator URL we would be replacing existing URL from “/ui2” with “sap/arsrvc_upb_admn/”(as shown in image below). This will basically use the service ‘arsrvc_upb_admn’ and we have to go into main.html.
    We can check the service in our SICF Transaction, which is responsible for Catalog and Group Management.


  • Step 9 –  We will be creating a new Catalog for that click on + Icon which is present in the bottom left side of the screen. The Catalog will be a Standard Catalog and for now let’s name it as Zdemo1_01 and unique ID Zdemo1_01, then click on Save.


  • Step 10 – In this step, we have seen how to Create Catalog, to Configure Fiori® Apps we need to Create Semantic Object Next and Action. Then Provide this Role With Target Mapping.

To view all the steps of Fiori® App Configuration you can Enroll in Fiori® for Developers Course With UI5CN here:

https://www.ui5cn.com/courses/fiori-for-developers


SAP® Fiori® Blog Series Links :

  1. SAP® Fiori® Launchpad Configuration – Starting with Catalog Creation (Current Blog)
  2. Understanding SAP® Fiori® Launchpad and Tiles Types
  3. SAP® Fiori® – Understanding Fiori® Catalogs, Tiles, Roles and Groups (Blog Comming Soon)
  4. Fiori® Applications Types and Architecture (Blog Comming Soon)
  5. Types of Fiori® Apps – Transactional Fiori® Application Overview and Architecture (Blog Comming Soon)
  6. Fact Sheet Fiori® App Architecture | Fact Sheet Applications | Types of Fiori® Application (Blog Comming Soon)
  7. Analytical & KPI Fiori® App Architecture | Analytical Fiori Application | Types of Fiori Application (Blog Comming Soon)
  8. SAP® Fiori® Architecture and Component | SAP® Fiori® Components | Fiori® Architecture (Blog Comming Soon)