In this blog, we will look at how to set-up the development environment before starting development of your applications.
We will be requiring eclipse luna IDE(Integrated Development Environment) which can be downloaded from here, you have to select the flavor(32/64bit) of the IDE as per your system configuration which can be found out by right clicking the My Computer and going to properties.You may also use sublime-text(free) and cloud9 ide(quick app development).
Make sure that Java is already installed on your machine because eclipse required Java to run.If it is not installed just install it from here.
Now we will see the UI5 tools repository URL which will be required to enter in eclipse as the steps given below to install all the required libraries to make available within eclipse.
Now click on Help –>Install New Software. As per the eclipse version(Mars/Luna) you have installed,choose the URL to be copied from here .Then paste it inside Install New Software.
After this, you will see a list of components asking for installation,but as we are focussing on UI5 so select the same from the last down(UI Development Toolkit for HTML5).Go ahead and press Next, accept all the license agreements.Then finally it will install the software within few minutes.
Now you have successfully setup your development environment …Yepi !
SAPUI5 (SAP user interface for HTML5) is a JavaScript library created by SAP. This library will be using to create HTML5 based applications, which will also be using CSS3 & AJAX too. The most interesting part of developing these type of application is, they will take its own visibility or appearances, when opened either on a desktop, mobile devices,tablets,web browsers etc. so the look and feel will not be hampered due to the responsiveness of the UI5 components.
What is the difference between OpenUI5 and SAPUI5 ?
OpenUI5(the Open-Source-licensed version of SAPUI5) comes with an APACHE2 license and SAPUI5 comes with an SAP license. OpenUI5 library does not require any permission to use it.We can get more details about the library on here.
What are the prerequisites technology to get started to learn UI5,or how many levels of knowledge one should have to get started with SAPUI5?
The prerequisites technology are
HTML5
CSS3
JavaScript
jQuery
oData
The level of knowledge required to get started with SAPUI5:-
HTML5 : You need not required to be an expertise with it, but yes you need to know the basic knowledge/syntax’s i.e. the tags of HTML at least and when to use them.
CSS3 : Yes, you need to have a pretty good knowledge of CSS, because in the project you will be working in will demand an in-depth knowledge of CSS.
JavaScript : We will be using in JavaScript to build our applications. So having a good sound knowledge in the same will help you to go ahead with it.
jQuery : If you do not have knowledge of jQuery,it may be managed, but we will be using it while integrating some third party libraries as and when required while developing the application.
oData : It deals with the JSON(JavaScript Object Notation)objects which will be acting as the data that will be coming from the back-end server.
So these are some pretty basic questions which, stay tuned for more !
We have covered all the steps related to hardware setup and have also configured the backend SAP HANA.
We’ll configure now the UI which is going to show the sensor information.
The UI is simple and we have kept two tiles
The first tile is showing the value of the sensor ie. the LUX value or light intensity. The small window, below the reading value, tells how the sensor looks like (used custom CSS mapping).
We are going to create a simple view and controller and place the tiles in the view.The tiles will be placed in the tile container and the tile container will be returned inside the content of the page.
sap.ui.jsview("shiot_ui_02.shiot_ui_02", {

/** Specifies the Controller belonging to this View.

* In the case that it is not implemented, or that "null" is returned, this View does not have a Controller.

* @memberOf shiot_ui_02.shiot_ui_02

*/

getControllerName : function() {

return "shiot_ui_02.shiot_ui_02";

},

/** Is initially called once after the Controller has been instantiated. It is the place where the UI is constructed.

* Since the Controller is given to this method, its event handlers can be attached right away.

* @memberOf shiot_ui_02.shiot_ui_02

*/

createContent : function(oController) {

var content = new sap.suite.ui.commons.NumericContent("idInRateValue", {

size: "S",

scale: "LUX",

value: "{/value}",

valueColor: "Good",

indicator: "{/direction}"

});

var tileContent = new sap.suite.ui.commons.TileContent("idInTileCont", {

unit: "",

size: "L",

content: [

content

]

});

var tileInInfo = new sap.suite.ui.commons.GenericTile("idTileInInfo", {

header: "In",

size: "S",

frameType: "TwoByOne",

tileContent: [

tileContent

]

});

var tileCompr = new sap.suite.ui.commons.GenericTile("idAllGTStatus", {

header: "Compare Level",

size: "L",

scale: "L",

frameType: "TwoByOne",

press: function(){

sap.m.MessageToast.show("Demo");

},

tileContent: [

new sap.suite.ui.commons.TileContent("idDaysComprDash", {

size: "S",

scale: "S",

content: [

new sap.suite.ui.commons.ComparisonChart("idDaysCompr", {

size: "XS",

width: "18rem",

data: [

new sap.suite.ui.commons.ComparisonData({

title: "Maximum Limit",

value: "{/comparisonValue1}",

color: sap.suite.ui.commons.InfoTileValueColor.Error

}),

new sap.suite.ui.commons.ComparisonData({

title: "Current",

value: "{/comparisonValue2}",

color: sap.suite.ui.commons.InfoTileValueColor.Critical

}),new sap.suite.ui.commons.ComparisonData({

title: "Mimumim Limit",

value: "{/comparisonValue3}",

color: sap.suite.ui.commons.InfoTileValueColor.Good

})

]

})

]

})

]

});

tileCompr.addStyleClass("sapMTile backGroundWhite");

var custeReading = new sap.m.CustomTile({

content: [

tileContent

]

});

var custeCompare = new sap.m.CustomTile({

content: [

tileCompr

]

});

var tileContainer = new sap.m.TileContainer("idMainTiles", {

tiles: [

custeReading,

custeCompare

]

});

//Polling implementation

setInterval(oController.changeKPITest, 1000 * 3);

// create the page holding the List

var page1 = new sap.m.Page({

title: "HANA IoT KPI",

enableScrolling: false,

content : [

tileContainer

]

});

return page1;

}

});
Controller:
sap.ui.controller("shiot_ui_02.shiot_ui_02", {

/**

* Called when a controller is instantiated and its View controls (if available) are already created.

* Can be used to modify the View before it is displayed, to bind event handlers and do other one-time initialization.

* @memberOf shiot_ui_02.shiot_ui_02

*/

//onInit: function() {

//

//},

/**

* Similar to onAfterRendering, but this hook is invoked before the controller's View is re-rendered

* (NOT before the first rendering! onInit() is used for that one!).

* @memberOf shiot_ui_02.shiot_ui_02

*/

onBeforeRendering: function() {

var data =     {

"value": 0,

"direction": "Down",

"comparisonValue1": 0,

"comparisonValue2": 0,

"comparisonValue3": 0

};

var oModel = new sap.ui.model.json.JSONModel();

oModel.setData(data);

sap.ui.getCore().setModel(oModel);

},

//Triggers automatically for display test

changeKPITest: function(){

/*var min = 0;

var max = 100;

var newRandomreading = Math.floor(Math.random() * (max - min)) + min;*/

var url = "http:///demoApp/demo01/app01/services/getSensorReading.xsjs?id=";

var _SENSORID = "A001";

var _MAXLIMIT = 170;

var _MINLIMIT = 25;

var data =     {

"value": 0,

"direction": "Down",

"comparisonValue1": _MAXLIMIT,

"comparisonValue2": 0,

"comparisonValue3": _MINLIMIT

};

var oModel;

var newColorCode;

//for now hardcoding the sensor ID

url = url + _SENSORID;

//Doing the asyn call to HANA system

jQuery.ajax({

url: url,

async: true,

dataType: 'json',

type: 'GET',

success: function(oData) {

if (!oData) {

sap.m.MessageToast.show("Not able to get Data");

} else {

data["value"] = oData["value"];

data["comparisonValue2"] = oData["value"];

oModel =  sap.ui.getCore().getModel();

if(oModel.getData()["comparisonValue2"] > data["comparisonValue2"]){

data["direction"] = "Down";

}else{

data["direction"] = "Up";

}

oModel.setData(data);

oModel.refresh();

//changing the color as well

newColorCode = parseInt(data["value"])*2  ;

if(newColorCode > 255){

newColorCode = 255;

}

$('#idInTileCont-footer-text').css("background-color", "rgba("+newColorCode+", "+newColorCode+", "+newColorCode+", 0.99)");

}

},

error: function(XMLHttpRequest, textStatus, errorThrown) {

sap.m.MessageToast.show("Connection not able to establish");

}

});

},

/**

* Called when the View has been rendered (so its HTML is part of the document). Post-rendering manipulations of the HTML could be done here.

* This hook is the same one that SAPUI5 controls get after being rendered.

* @memberOf shiot_ui_02.shiot_ui_02

*/

//onAfterRendering: function() {

//

//},

/**

* Called when the Controller is destroyed. Use this one to free resources and finalize activities.

* @memberOf shiot_ui_02.shiot_ui_02

*/

//onExit: function() {

//

//}

});
Here the controller function changeKPITest is polled every 3 sec and we have the new data bound to model, which is returned from SAP HANA XSJS AJAX call .
It is better to have a push notification feature in here instead of polling which, is called web-sockets, but for simplicity purpose we have kept the configuration minimal.
In part 7, we are tying the loose ends and going live.
Once you have activate the code, you need to create two tables demo02sensor_active_TS and demo02sensor_info_MD .
demo02sensor_active_TS: Stores the transactional Data of the sensors (readings with timestamp).
demo02sensor_info_MD: Stores the Master Data of the sensors (Sensor Id’s)
Step2 – Create the SQL procedures to do data operations
We have to create two SQL procedures for data operations: insert_sensor_reading.hdbprocedure and sensor_read.hdbprocedure.
As the names suggest, the first one is going to insert sensor data in sensor table and second one is going to read the recent sensor data from the table.
insert_sensor_reading.hdbprocedure is inside the folder Procedures. It is taking sensor ID and sensor Reading as input:
PROCEDURE
"DemoSchema"."demoApp.demo01.app02.SHIOT_02.Procedures::insert_sensor_reading" (

IN SENSORID NVARCHAR(10),

IN sensor_reading INTEGER )

LANGUAGE SQLSCRIPT AS

BEGIN

/*****************************

Inserting sensor Data

*****************************/

insert into "demoApp.demo01.app02.SHIOT_02.Data::demos02sensorNetwork.demo02sensor_active_TS"

VALUES(:SENSORID, CURRENT_TIMESTAMP , sensor_reading

);

END;
sensor_read.hdbprocedure is inside the folder Procedures. It is taking sensor ID as input and returns one data set of demo02sensor_active_TS.
PROCEDURE
"DemoSchema"."demoApp.demo01.app02.SHIOT_02.Procedures::sensor_read(

IN id NVARCHAR(10),

OUT result "DemoSchema"."demoApp.demo01.app02.SHIOT_02.Data::demo02sensorNetwork.demo02sensor_active_TS")

LANGUAGE SQLSCRIPT

SQL SECURITY INVOKER

--DEFAULT SCHEMA

READS SQL DATA <u>AS</u>

BEGIN

/*****************************

Reading sensors Data

*****************************/

result = select *

from "DemoSchema"."demoApp.demo01.app02.SHIOT_02.Data::demo02sensorNetwork.demo02sensor_active_TS"

where "ID" = :id and "time_stamp" = (select max("time_stamp") from

"DemoSchema"."demoApp.demo01.app02.SHIOT_02.Data::demo02sensorNetwork.demo02sensor_active_TS"

where "ID"= :id);

END;
Step3: Create the XSJS services
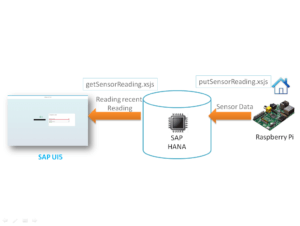
Create the XSJS services to act as a Gateway between the SQL Procedures calls and the service calls for Raspberry Pi and SAP UI5 application:
We have two services.
The first one is getSensorReading.xsjs which reads the recent sensor reading for the sensor id, passed in the URL. It uses sensor_read.hdbprocedure for database call.
var sensorId = $.request.parameters.get("id");

var body = "error";

var data ={

"id":"error",

"timestamp":"error",

"value":0

};

body = sensorId;

if(sensorId === undefined){

$.response.setBody( "Invalid key !!!");

}

else{

$.response.contentType = "text/plain";

$.response.setBody(sensorId);

try {

var conn = $.db.getConnection();

var query = 'call \"demoApp.demo01.app02.SHIOT_02.Procedures::sensor_read\"(?,?)';

var cst = conn.prepareCall(query);

cst.setString(1, sensorId);

var rs = cst.execute();

conn.commit();

rs = cst.getResultSet();

while(rs.next()){

data.id = rs.getNString(1);

data.timestamp= rs.getTimestamp(2) ;

data.value= rs.getInteger(3);

}

body = JSON.stringify(data);

conn.close();

} catch (e) {

body = e.stack + "\nName:"+ e.name+"\nMsg" + e.message;

$.response.status = $.net.http.BAD_REQUEST;

}

}

$.response.contentType = "text/plain";

$.response.setBody(body);
Then after that, we use putSensorReading.xsjs which reads the recent sensor reading for the sensor id and sensor value passed in the URL. It uses insert_sensor_reading.hdbprocedurefor database call to store the data.
var sensorId = $.request.parameters.get("id");

var sensorReading = $.request.parameters.get("value");

sensorReading = parseInt(sensorReading,10);

var body = "error";

if(sensorId === undefined){

$.response.setBody( "Invalid key !!!");

}

else{

$.response.contentType = "text/plain";

$.response.setBody(sensorId);

try {

var conn = $.db.getConnection();

var query = 'call \"demoApp.demo01.app02.SHIOT_02.Procedures::insert_sensor_reading\"(?,?)';

var cst = conn.prepareCall(query);

cst.setString(1, sensorId);

cst.setInteger(2, sensorReading);

var rs = cst.execute();

conn.commit();

//as no record returned

if(rs == 0){

body = true;

}

conn.close();

} catch (e) {

body = e.stack + "\nName:"+ e.name+"\nMsg" + e.message;

$.response.status = $.net.http.BAD_REQUEST;

}

}

$.response.contentType = "text/plain";

$.response.setBody(body);
In the real world setup we need also to assign the security key to each sensor and pass it to verify the readings.
Also it would be better to have the timestamp taken from the sensor source and store it in the database but for keeping the coding and complexity minimum we are focusing on the core steps.
In part 6, we are going to setup the SAPUI5 App and integrate it with the backend.
Step 3 – Using Java in Raspberry Pi in order to read serial data of Arduino
This part is the most challenging part for someone who is new to Raspberry Pi, so we have decided to create the entire setup in the utmost simplistic way in 5 sub-steps:
Step 1: Install java in the Raspberry Pi.
Usually Raspbian comes with Java installed but you can still check it via the following command:
java -version
When you update your Raspbian, it will also update the Java library, if required.
sudo apt-get update
Step 2: The communication is in serial mode, between Arduino and Raspberry Pi, so we need a way to make our Java program to understand it. So Download the below files :
and go to the download folder of the files and type below commands: sudo cp libjawt.so /usr/lib/jvm/jdk-8-oracle-arm-vfp-hflt/lib/arm sudo cp RXTXcomm.jar /usr/lib/jvm/jdk-8-oracle-arm-vfp-hflt/jre/lib sudo cp librxtxSerial.so /usr/lib/jvm/jdk-8-oracle-arm-vfp-hflt/lib/arm sudo cp librxtxSerial.so /usr/lib/jni/
Now, we are assuming here that you have your jdk-8-oracle-arm-vfp-hflt inside your /usr/lib/jvm. If you don’t, then your Java won’t be updated to jdk-8 and you have to update the JDK and JRE .
sudo apt-get install oracle-java8-installer
Step 3: Now you can copy below Java code.
import java.io.BufferedReader;
import java.io.InputStreamReader;
import java.io.OutputStream;
import gnu.io.CommPortIdentifier;
import gnu.io.SerialPort;
import gnu.io.SerialPortEvent;
import gnu.io.SerialPortEventListener;
import java.util.Enumeration;
import java.net.HttpURLConnection;
import java.net.URL;

public class SerialTestGET implements SerialPortEventListener {
SerialPort serialPort;
static int sensorValue = 0;
/** The port we're normally going to use. */
private static final String PORT_NAMES[] = {
"/dev/tty.usbserial-A9007UX1", // Mac OS X
"/dev/ttyACM0", // Raspberry Pi
"/dev/ttyUSB0", // Linux
"COM3", // Windows
};
/**
* A BufferedReader which will be fed by a InputStreamReader
* converting the bytes into characters
* making the displayed results codepage independent
*/
private BufferedReader input;
/** The output stream to the port */
private OutputStream output;
/** Milliseconds to block while waiting for port open */
private static final int TIME_OUT = 2000;
/** Default bits per second for COM port. */
private static final int DATA_RATE = 9600;

public void initialize() {
// the next line is for Raspberry Pi and
// gets us into the while loop and was suggested here was suggested http://www.raspberrypi.org/phpBB3/viewtopic.php?f=81&t=32186
System.setProperty("gnu.io.rxtx.SerialPorts", "/dev/ttyACM0");

CommPortIdentifier portId = null;
Enumeration portEnum = CommPortIdentifier.getPortIdentifiers();

//First, Find an instance of serial port as set in PORT_NAMES.
while (portEnum.hasMoreElements()) {
CommPortIdentifier currPortId = (CommPortIdentifier) portEnum.nextElement();
for (String portName : PORT_NAMES) {
if (currPortId.getName().equals(portName)) {
portId = currPortId;
break;
}
}
}
if (portId == null) {
System.out.println("Could not find COM port.");
return;
}

try {
// open serial port, and use class name for the appName.
serialPort = (SerialPort) portId.open(this.getClass().getName(),
TIME_OUT);

// set port parameters
serialPort.setSerialPortParams(DATA_RATE,
SerialPort.DATABITS_8,
SerialPort.STOPBITS_1,
SerialPort.PARITY_NONE);

// open the streams
input = new BufferedReader(new InputStreamReader(serialPort.getInputStream()));
output = serialPort.getOutputStream();

// add event listeners
serialPort.addEventListener(this);
serialPort.notifyOnDataAvailable(true);
} catch (Exception e) {
System.err.println(e.toString());
}
}

/**
* This should be called when you stop using the port.
* This will prevent port locking on platforms like Linux.
*/
public synchronized void close() {
if (serialPort != null) {
serialPort.removeEventListener();
serialPort.close();
}
}

/**
* Handle an event on the serial port. Read the data and print it.
*/
public synchronized void serialEvent(SerialPortEvent oEvent) {
if (oEvent.getEventType() == SerialPortEvent.DATA_AVAILABLE) {
try {
String inputLine=input.readLine();
//System.out.println(inputLine);
sendGet(inputLine);
} catch (Exception e) {
System.err.println(e.toString());
serialPort.removeEventListener();
serialPort.close();
}
}
// Ignore all the other eventTypes, but you should consider the other ones.
}

// HTTP GET request
public void sendGet(String inputLine) throws Exception {

try{
//if difference is more than 3 then send data to SAP HANA
if(inputLine != null && inputLine .length() > 0 && Math.abs(sensorValue - Integer.parseInt(inputLine)) > 3 ){

sensorValue = Integer.parseInt(inputLine);
//Considering that A001 sensor is connection with this raspberry pie for now
//we can even pass this with command line but for simplicityhardcoding it
//Replace with your HANA server URL and port number
String url = "http:///demoApp/demo01/app01/services/putSensorReading.xsjs?id=A001&value=";
url = url + inputLine;

URL obj = new URL(url);
HttpURLConnection con = (HttpURLConnection) obj.openConnection();

// optional default is GET
con.setRequestMethod("GET");

//add request header
//con.setRequestProperty("User-Agent", USER_AGENT);

int responseCode = con.getResponseCode();
if(responseCode == 200){
System.out.println("OK value:"+inputLine);
}else{
System.out.println("Error: Response code "+responseCode);
}

}
System.out.println("OK value: Less than 3");
}catch (Exception e) {
System.err.println(e.toString());
serialPort.removeEventListener();
serialPort.close();
}

}

public static void main(String[] args) throws Exception {
SerialTestGET main = new SerialTestGET();
main.initialize();

Thread t=new Thread() {
public void run() {
//the following line will keep this app alive for 1000 seconds,
//waiting for events to occur and responding to them (printing incoming messages to console).
try {Thread.sleep(1000000);} catch (InterruptedException ie) {}
}
};
t.start();
System.out.println("Started");
}
}
Here, we are giving a class path of our RXTX.jar file and using 1.6 compatible compiler mode because the Jar file is 1.6 compatible.
Step 5: If there is no error (warnings may come), then your setup is right and you can now read the Arduino data in your serial port of Raspberry Pi, with the step 4 Java compiled code.
You can change the Java code of Step 3 and recompile it, in order to fit your requirements as well.
In the part 5, we will see how to configure the SAP HANA system and SAPUI5 application.