Tesla cars have shown that electric cars can be way cooler and better.At a recent Model 3’s launch event, Tesla reviled its Model 3’s, it looked like a car of future ready for today.
In a recent reply to twitter feeds Elon Musk founder and CEO of Tesla mentioned that the steering control system of Model 3 will feel like a spaceship.
Being in tech world for a while, discussions related to new technologies and innovation are not new to me. They happen all the time !
And as a guy who likes to play in bleeding edge technologies, I always want to show my audience the next cool big thing.
As the name suggests, Zero UI is about removing the UI, that is acting as a barrier between the user and the device, in order to provide a more seamless interaction with the technology.
Have a look at this video, you will get a better idea.
This is an example of Microsoft® Kinect for retail.
There are also a few new announcements in this topic, from Google® as well, one under the name Project Soli, which is a radar-based wearable to control anything. Based on the assumption that our hand is the ultimate device for input, Project Soli is developing a new interaction sensor using radar technology. The sensor can track sub-millimeter motions at high speed and accuracy. It fits onto a chip, can be produced at scale and built into small devices and everyday objects.
If you have never heard the name DuckDuckGo then, you might be thinking if this is a cartoon show or movie we are talking about. But in reality DuckDuckGo is a search engine.
In the search engine world, dominated by Google, DuckDuckGo is setting itself apart by going into an interesting niche: helping developers to write, review and fix code in open source repository every day.
When we are developing, we require access to code, examples, syntax help and answers to technical questions.
And can be annoying when we are looking for answers and still we are not clear what to do!
Next time, in a similar situation, you should give DuckDuckGo a shot.
To know more how to use DuckDuckGo for your webpage, you can have a look at this.
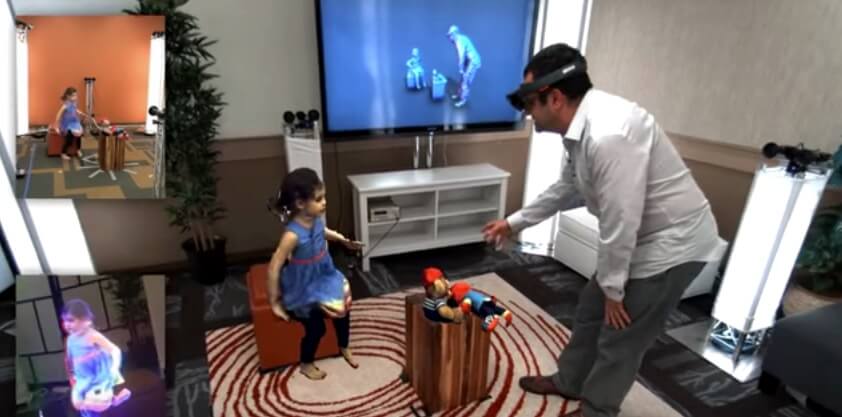
Imagine you can talk with your friends and family in a 3-D reality world like in the sci-fi movies.The new Holoportation technology is out by Microsoft® which also recently launched a live demonstration of how it can be made possible.
It is a new 3-D capture technology that allows high quality 3-D models of people.The capture video goes under reconstruction, compression and transmission anywhere in the world in real time.This will allow user to interact with remote participants in 3-D as if they are actually standing next to them and having a normal conversation .